Link back to the Teacher’s Guide Table of Contents
Contents
- Natural and artificial selection; population genetics
- Speciation
- Evidence for evolution
- Phylogeny
- Origin of Life
Essential Links
- The College Board’s AP Bio Course and Exam Description.
- My AP Exam Review Outline: Takes the Course and Exam description and renders it into student (and teacher) friendly language.
- AP Bio Scope and Sequence Calendar: A spreadsheet that lays out the entire course.
Topics 7.1 to 7.5: Natural and Artificial Selection; Population Genetics
Unit 7: Introductory Thoughts
First, a gripe about the College Board’s name for Unit 7. It’s “Natural Selection.” That’s way too narrow. One of the major ideas of topics like population genetics and extinction is that not all evolutionary change is selective. There’s a big dose of randomness, which is what genetic drift is all about. There’s also a big dose of contingency in evolutionary history. Who dies in a mass extinction is often about being in the wrong place at the wrong time. The survivors (like our mammalian ancestors who survived that asteroid impact that ended the reign of the dinosaurs 65 million years ago) were often just lucky. Remember to emphasize both ideas to your students.
Topic 7 is a big chunk of our AP Biology course, and the Course and Exam Description allots Topic 7 more class periods and a higher AP exam weighting than any other unit. It’s also, to my mind, the apex of our course: it brings together what you’ve previously taught in every other unit, and it sets the stage for ecology. The College Board suggests about 20 – 23 class periods, and I think that’s about right.
Natural Selection and Population Genetics Teaching Tips
Here are a few ideas to emphasize when teaching about natural, artificial, and sexual selection.
1. Randomness and design: The philosopher Daniel Dennett called natural selection “the best idea anybody ever had…It unites the two most disparate features of all of reality. On the one side purposeless matter and motion…on the other side meaning, purpose, and design.”
One of the most widely shared misconceptions about evolution is the idea that evolution is a random process. Of course, it’s not. The mutations that underlie variation are random. But the selection that leads to adaptation is not random. Selection is about fitness, which is a concept that can be rigorously quantified. A great way to help your students see this is through the HHMI video and activities about the rock pocket mouse.
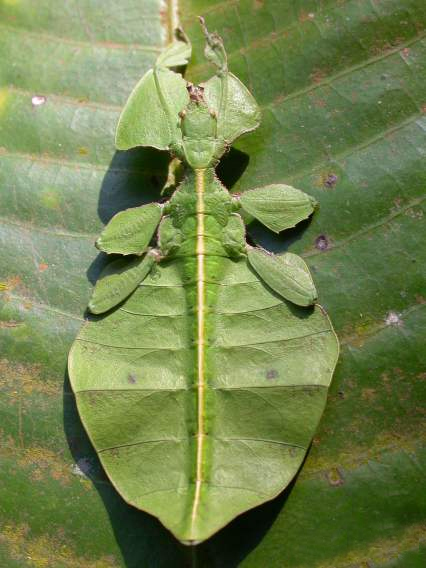 2. Selection can unleash positive feedback loops that accentuate selection The result of selection (artificial or natural) is a shift in allele frequencies. But what’s being selected are phenotypes. When you use illustrative examples like the peppered moth or the rock pocket mouse, you can talk to your students about how predatory birds (in both cases) are selecting against poorly camouflaged individuals. When the birds eat those individuals, they’re (literally) eating the genes for poor camouflage. Because the genes for good camouflage are left in the bodies of the prey, the paradoxical result is that predation increases the frequency of alleles for good camouflage. And the result of that is that superior camouflage selects for improved visual discrimination in predators…which feeds back to the prey. The results can be astonishing, as in this picture of a leaf insect.
Positive feedback loops are also at work in sexual selection, especially in intersexual selection (where, in mammals and birds, females choose which male they wish to mate with). The male with the most attractive trait passes that trait on to its male offspring. And the female passes her preference for that trait onto her female offspring. That dynamic, over time, results in the accentuation of both the trait and the preference for the trait, with results like the peacock’s tail.
3. Artificial selection is a useful bridge to understanding natural selection. Though the CED lists natural selection before artificial selection, I teach artificial selection first. It’s concrete and easy to understand. For most students, understanding how selective breeding enabled dog breeders to create various breeds of dogs, or how plant breeders were able to convert wild Brassica oleracea into cultivated varieties like broccoli, cauliflower, cabbage, Brussels sprouts, etc., is pretty straightforward. A great lecture prop is to have examples of each of these vegetables to show to your students. But if you can’t you can use this image from my website.
4. As environments change, so do selective pressures. A great example of this is the rapid evolution of beak depth observed in the Galapagos finches on Daphne Major in the Galapagos Islands, as famously studied by Peter and Rosemary Grant. The Grants were able to track yearly shifts in the mean phenotype of the medium ground finch in response to the amount of rainfall on the island, which changed the type of vegetation. This is all covered in HHMI’s video about finch evolution, which you can access at https://www.biointeractive.org/classroom-resources/origin-species-beak-finch. For a summer read, you (or your students) can read The Beak of the Finch, by Jonathan Weiner.
And here’s a similar list of ideas and tips for teaching population genetics and Hardy-Weinberg.
1. The terms “dominant” and “recessive” have nothing to do with “common” and “rare.”
Students often enter this unit with a big point of confusion. If your students are like mine, there are always a few students who will ask something like “If dominant alleles are dominant, then why doesn’t everyone in a population have that allele?” Those students are often my most confident students…and my guess is that most students naively come into a population genetics unit with some version of this incorrect idea in their minds. This is a deeply rooted misconception that I’ve been battling against for years. Overcoming it involves showing students that the meaning of the term “dominant” in “dominant” allele doesn’t make that allele like a dominant army that will conquer all else in its path, and spread like a virus. Ultimately, you want your students to understand that the frequency of an allele has to do with the qualities of the phenotype that it codes for and whether that phenotype is harmful or beneficial.
2. When you teach the Hardy-Weinberg equations, use cross-multiplication tables.
If you’re a gifted math instructor, you can teach students how to manipulate the Hardy-Weinberg equations.
- p + q = 1, and
- p2 + 2pq +q2 = 1
If (like me) you’re not, you’ll want to consider adopting a trick I learned years ago. Use modified Punnett squares called “cross-multiplication tables.” Here’s what they look like:
| A (0.3) | a (0.7) | |
| A (0.3) | AA (0.09) | Aa (0.21) |
| a (0.7) | Aa (0.21) | aa (0.49) |
Note how if you know the proportion of recessives in a population (aa, above), you can take the square root of that to figure out the frequency of the recessive allele. Since p + q = 1, subtracting the frequency of “q” from 1 gives you the frequency of the dominant allele. And from there you can figure everything else out.
Natural Selection and Population Genetics tutorials on Learn-Biology.com
Here’s a list of tutorials that cover all of the objectives above.
All of these are pretty short. Your students can probably handle two each night, allowing you to get through them all in a week.
- Topics 7.1 – 7.3, Part 1: Natural and Artificial Selection
- Topics 7.1 – 7.3, Part 2: Sexual Selection
- Topics 7.4 -7.5, Part 1: Understanding Allele Frequencies
- Topics 7.4 -7.5, Part 2: The Hardy-Weinberg Equation
- Topics 7.4 -7.5, Part 3: The Hardy-Weinberg Principle
- Topics 7.4 -7.5, Part 4: Natural Selection in Gene Pools
- Topics 7.4 -7.5, Part 5: Mutation, Heterozygote Advantage, and Genetic Drift
- Topics 7.4 -7.5, Part 6: Natural Selection and Population Genetics Cumulative Flashcards and Quiz (Speed Challenge)
Additional Resources for Natural Selection and Population Genetics.
If you didn’t start your year with Natural selection, then please read my notes from Week 1, Days 3 and 4. They’ll point you to two great activities that you’ll be able to use with your students.
A classic population genetics demonstration is to hand out PTC paper and identify the percentage of tasters and non-tasters in your class population. From there, you can calculate the frequency of the recessive allele (the non-tasting allele) in your class gene pool. To learn more about PTC, read this article at the University of Utah’s Genetic Science Learning Center.
The folks at Flinn have a POGIL on Hardy Weinberg.
I mentioned above HHMI’s Video about The Galapagos Finches. When I show that video, I also use this student guide (a google doc version of their PDF, with some of their instructor resources thrown in). Here’s the original teacher’s guide (with the answers).
Since mutation is one of the violations of Hardy-Weinberg equilibrium, this unit is a great time to review it. If you need to, you can use Flinn’s POGIL on mutation, or HHMI’s handout about Mutations and M1CR Signalling in the Rock Pocket Mouse. That handout lets you review natural selection, mutation, and cell signaling in one activity. Highly recommended.
HHMI also has two additional activities that are excellent for kicking off natural selection and population genetics.
- HHMI: Skin Color Evolution. This focuses on the work of Nina Jablonski relating to the evolution of skin color variation in human populations. The resources include
- Allele and Phenotype Frequencies in Rock Pocket Mouse Populations. This activity takes what your students previously learned about the evolution of different color phenotypes among rock pocket mice, and grounds it in the Hardy-Weinberg equations.
Topics 7.10 – 7.12: Speciation, Variation, and Extinction.
See above for why I teach speciation following population genetics.
Teaching notes and objectives for speciation and extinction
Speciation is not, in my experience, a particularly difficult topic for most students. The allopatric model of speciation is very easy to understand. Sympatric speciation that’s not based upon polyploidy (which is extremely common in plants) can be a bit harder for students to visualize, but I provide several examples in my tutorials. And reproductive isolating mechanisms are also straightforward.
What students can have a bit of trouble with is overcoming some naive biology preconceptions. For example, a lot of my students, over the years, don’t know that a taxon like “duck” is a family of species. Similarly, the distinction between a breed or a variety and a species is not an intuitive concept for many students. To help my students with this concept, I do an activity where I hand out copies of Peterson’s Field Guide to Western Birds (I have a half a class set: you can make copies of relevant pages), and I have my students look at the number of duck and songbird species we have in our local area. It’s eye-opening for a lot of students.
Click here for teacher/student-friendly learning objectives (derived from the 2025 version of the College Board’s Course and Exam Description.
Note also that we return to the topic of extinction in the last topic in the curriculum, Disruptions to Ecosystems (Topic 8.7).
Teaching Species and Speciation on Learn-Biology.com
Here’s how you can use the five tutorials on Learn-Biology.com to cover the objectives listed above.
Topics 7.10 – 7.12, Part 1: What is a Species?
Covers the biological species concept, its limitations, and reproductive isolating mechanisms.
Topics 7.10 – 7.12, Part 2: Allopatric speciation
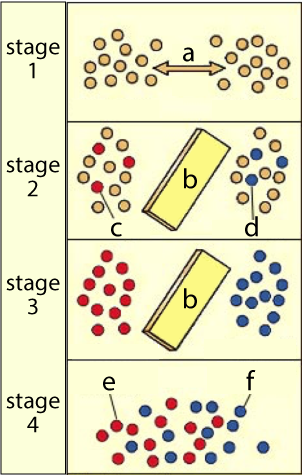
Covers the process of allopatric speciation. If your students can explain a diagram like the one at left, then they’re pretty much set.
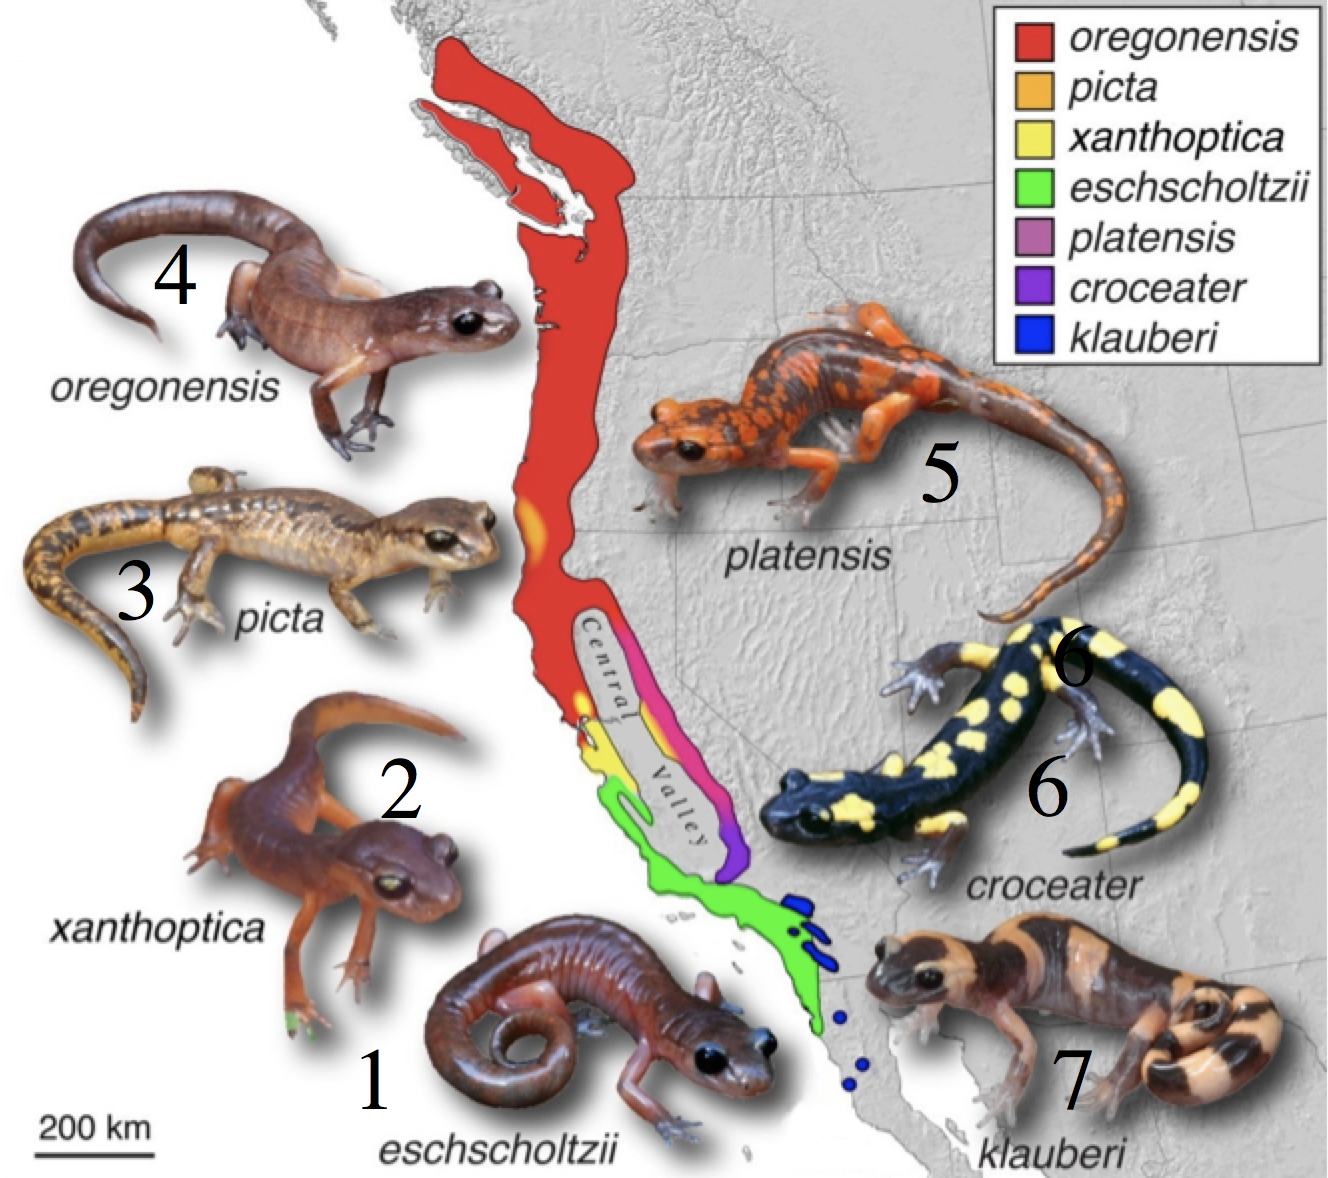
I also discuss ring species like the California salamander Ensatina eschscholtzii.
Explains how sympatric speciation occurs through polyploidy and allopolyploidy, sexual selection, disruptive selection, and microhabitat differentiation.
The last section focuses on adaptive radiation, particularly in island archipelagos.
Topics 7.10 – 7.12, Part 4: Extinction
Covers how species become extinct (the extinction vortex), background rates of extinction, mass extinctions, and the consequences of extinction.
Topics 7.10 – 7.12, Part 5: Speciation and Extinction: Cumulative Flashcards and Quiz
A set of flashcards and a multiple choice quiz to help your students pull together everything about speciation and extinction.
Additional Resources for Teaching about Speciation
HHMI has a fantastic activity about speciation (which also introduces phylogeny). It’s called Using DNA to Explore Lizard Phylogeny. This activity goes with the video The Origin of Species: Lizards in an Evolutionary Tree. It’s a very rich activity, involving speciation, natural selection, sexual selection, convergent evolution, DNA sequencing, and phylogeny. It requires a bit of setup (printing out or otherwise making available photos of Anole lizards on various Caribbean Islands for an opening card sort activity), but it’s well worth the effort. Also, the phylogeny program the activity uses can be a bit hit or miss. Use the teacher’s guide to have the output ready to go in case the program hangs up.
If you want to go even deeper, then use HHMI’s Lizard Evolution Virtual Lab. The benefit of this activity is that your students will do some of the science (measuring lizard limb length, analyzing toe pads, etc.) to get morphological data about the different lizard ecomorphs. The drawback is that this will take you 3-4 class periods, as opposed to what I described immediately above, which takes about 90 minutes.
You can also use Flinn’s POGILs on Selection and Speciation.
The College Board dropped mass extinction from the 2025 Course and Exam Description. However, I can’t resist sharing two fabulous resources, just in case you want to mention how our presence on Earth as the dominant mammal probably wouldn’t have happened if Earth hadn’t been walloped by an asteroid/comment about 65 mya.
- The impact scene from the 1990s movie Deep Impact
- This episode of Radiolab about the Cretaceous extinction (the one that wiped out the dinosaurs).
Topics 7.6 – 7.8: Evidence for Evolution
Teaching Evidence for Evolution: some initial thoughts
Teaching about the evidence for evolution is a key part of our struggle against our common enemy, Biology Confusion. Creationism is widespread throughout the United States. Exactly how widespread is hard to know. It depends a lot on how people are asked about their beliefs. You can read more about that in this article in Scientific American.
Having said that, I need to confess that I have it easy when it comes to teaching about the evidence for evolution. I live and teach in Berkeley, California, a very liberal, pro-science college town. There’s no pushback when I teach this topic. I understand that’s quite different from the situation you might be in.
To support your efforts to teach this topic, our module on evidence for evolution goes into a lot of detail. We offer four tutorials, followed by a comprehensive quiz. Let me walk you through the College Board’s objectives for this topic first, and then I’ll tell you about our tutorials.
A Summary of the College Board’s Learning Objectives for Evidence for Evolution
The College Board’s Course and Exam Description divides the teaching of evidence for evolution into three topics (see above). Below, I’ve combined these topics into one set of objectives.
- Explain what fossils are, and how fossils can be dated.
- Radioactive decay can show the age of igneous rocks in sedimentary strata adjacent to fossils.
- The decay of carbon-14 can show the age of relatively recent fossils.
- Geological strata and the use of index fossils can show relative dates.
- Describe homologous structures
- Structures that show evidence of common ancestry because of similarity in structure or similar embryological origin.
- Describe vestigial structures
- Structures that have lost their function, and only exist because of their inheritance from a common ancestor.
- Describe molecular homologies and vestigial features at the molecular level.
- Shared sequences in proteins and nucleic acids that show evidence of common ancestry.
- Pseudogenes are inactive gene sequences that persist in the genome.
- List and describe the molecular homologies that indicate that all living things share a common ancestor.
- DNA, RNA, ribosomes, the genetic code, and shared metabolic pathways (chemiosmosis)
- List and describe the cellular and genetic homologies that indicate that all eukaryotes share a common ancestor.
- Membrane-bound organelles, linear chromosomes, genes with introns, mitochondria
- List and describe the evidence that evolution continues
- Changes in the fossil record
- The ongoing evolution of resistance to antibiotics, pesticides, herbicides, antiviral drugs, and chemotherapy drugs.
- Newly emerging pathogens and diseases.
Teaching Evidence for Evolution on Learn-Biology.com
Here’s how you can use the four tutorials on Learn-Biology.com to cover the objectives listed above (and go quite a way beyond them). Note that the sequence of ideas below is different from what the College Board suggests. As I hope you’ll agree, the sequence below makes more pedagogical and biological sense. In any case, completing our tutorials will ensure that your students will achieve all of the CB objectives…and deepen their biological thinking skills along the way.
Topics 7.6 – 7.8, Part 1: What Constitutes Evidence for Evolution? Historical Observations
Our first tutorial starts by looking at the difference between a hypothesis and a theory. The goal here is to establish the importance of evolution and to make sure that your students understand that when we say “theory of evolution,” we’re not talking about someone’s idea or opinion, but rather a “comprehensive explanation of some aspect of nature that is supported by a vast body of evidence” (US National Academy of Sciences).
Once that’s established, we look at the two claims that evolutionary theory makes. In other words, if evolution is true, then we should see:
- Descent with modification
- Change in a population’s genetic structure over time.
Do we see this? The tutorial ends with examples of evolutionary changes that have been observed in recent times. The examples include
- Evolution of antibiotic and pesticide resistance in bacteria and insects, respectively
- Evolution of a new phenotype in the soapberry bug as it adapted to changes in its host species.
Both of these are presented in the context of research studies and data sets, so your students’ ability to interpret and analyze information will deepen as they learn this new content.
Topics 7.6 – 7.8, Part 2: Homologous and Vestigial structures
This tutorial starts by teaching about adaptive radiation. Why? Because when you think about it, adaptive radiation, on both a small and large scale, is the basis for homologous features. Consider the Galapagos Finches. Their divergent beaks are homologous: derived from a common ancestor, adapted to the different ecological niches into which each descendent species evolved.
On a larger timescale, the same process underlies homologies like these…
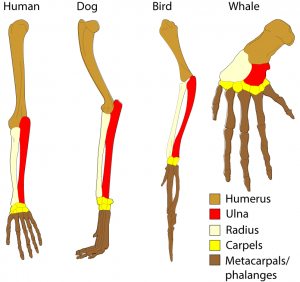
…as well as phenomena like the vestigial eyes in cavefish, the human coccyx, and the vestigial muscles that are connected to our ears, (but which most of us are unable to use to reposition our ears (as can many of our mammalian cousins).
Topics 7.6 – 7.8, Part 3: The Fossil Record
This tutorial covers two major areas:
- The fossil record
- What fossils are and how they form
- Relative and absolute dating of fossils
- How the fossil record serves as evidence of evolution.
Topics 7.6 – 7.8, Part 4: Biogeography, Analogous Traits, and Convergent Evolution
Jerry Coyne, in his fabulous book Why Evolution is True, calls biogeography the piece of evidence for evolution that creationists have the most trouble with. This section of the tutorial will leave your students with a solid understanding of
-
- Biogeography and the pattern of life’s distribution on Earth
- Parallel evolution
- Convergent evolution and analogous traits
- The evolution of the unique biology of oceanic islands.
Topics 7.6 – 7.8, Part 5: Embryological, Molecular, and Genetic Evidence
This last tutorial covers additional lines of evidence for evolution (mostly covering material in topic 7.7). This includes
- Embryological evidence for evolution. Why do early embryonic forms of the animals in the same clade look so similar? Why do features like a post-anal tail arise in the ape clade (our clade) early in embryonic development, only to be reabsorbed later on (before birth)?
- What are molecular homologies, and how do they provide evidence of common ancestry and descent with modification?
- How can homologous and vestigial features be identified in genes?
- What are the deepest homologies that serve as evidence for a common ancestry of all living things?
Finally, the module ends with this cumulative Topics 7.6 – 7.8, Part 6: Evidence for Evolution Cumulative Flashcards and Multiple Choice Quiz
Additional Evidence for Evolution Resources
If you’re looking for a worksheet to either preview or consolidate the material in these tutorials, you can use the one on this page. Currently, I’ve only uploaded it in pdf format and Word format. If you’re in a jam and need something that you can modify, email me and I’ll convert it into a google doc for you.
The Youtube Channel “Stated Clearly” has a very solid “evidence for evolution” video. It’s about 14 minutes long. It might feel a bit elementary, but at the very least it’s a good introduction/summary.
If you have time, then the PBS Evolution series has two great videos, both of which are available on YouTube. The only problem with these videos is that they’re long (2 hours and one hour respectively).
- Darwin’s Dangerous Idea simultaneously recreates Darwin’s discovery of natural selection and presents the evidence for evolution.
- Great transformations looks at homology, working backward from whales to tetrapods, to homeotic genes. Here’s a video guide.
Teaching notes and objectives for Topic 7.9, Phylogeny
Here are the College Board’s objectives related to phylogeny:
- EU EVO-3: Life continues to evolve within a changing environment.
- LO EVO-3.B: Describe the types of evidence that can be used to infer an evolutionary relationship.
- EVO-3.B.1: Phylogenetic trees and cladograms show evolutionary relationships among lineages—
- a. Phylogenetic trees and cladograms both show relationships between lineages, but phylogenetic trees show the amount of change over time, calibrated by fossils or a molecular clock.
- b. Traits that are either gained or lost during evolution can be used to construct phylogenetic trees and cladograms—
- i. Shared characters are present in more than one lineage.
- ii. Shared, derived characters indicate common ancestry and are informative for the construction of phylogenetic trees and cladograms.
- iii. The out-group represents the lineage that is least closely related to the remainder of the organisms in the phylogenetic tree or cladogram.
- c. Molecular data typically provide more accurate and reliable evidence than morphological traits in the construction of phylogenetic trees or cladograms.
- LO EVO-3.C: Explain how a phylogenetic tree and/or cladogram can be used to infer evolutionary relatedness
- EVO-3.C.1: Phylogenetic trees and cladograms can be used to illustrate speciation that has occurred. The nodes on a tree represent the most recent common ancestor of any two groups or lineages.
- EVO-3.C.2: Phylogenetic trees and cladograms can be constructed from morphological similarities of living or fossil species and DNA and protein sequence similarities.
- EVO-3.C.3: Phylogenetic trees and cladograms represent hypotheses and are constantly being revised, based on evidence.
To break that down into something a bit more manageable, here’s what to focus on. Students should be able to
- Describe the types of evidence that can be used to infer evolutionary relationships.
- Morphological similarities that show homology
- DNA and RNA sequences
- Be able to construct and analyze phylogenetic trees and cladograms. The key things to be able to identify are
- Common ancestors
- Which clades are most closely related (and why)
- With regards to phylogenetic trees, define (and be able to identify) clades, shared derived features, ancestral features, outgroups, nodes, and common ancestors.
- Understand what phylogenetic trees represent in terms of evolutionary understanding.
- Phylogenetic trees and cladograms are hypotheses about evolutionary relatedness that need to be revised in light of new information.
- Compare the value of sequence data and morphological data in terms of constructing phylogenetic trees.
- Molecular data typically provide more accurate and reliable evidence than morphological traits
- Explain how molecular clocks work.
- Nodes are dated based on correlation with the fossil record. This enables the extrapolation of divergence times in other branches of the same phylogenetic tree.
It’s useful if, going into this, your students have familiarity with the difference between homologous and analogous features.
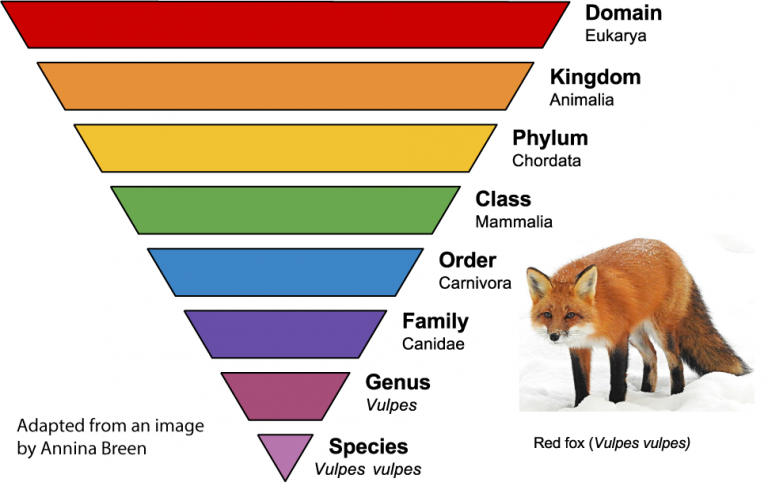
Because I can’t imagine my students leaving my AP Biology course without knowing this, I also teach a bit about traditional classification. That includes binomial nomenclature and the basic classification categories for animals (kingdom, phylum, class, etc.)
Teaching phylogeny on Learn-Biology.com
If you want to motivate your students to learn about phylogeny, take your students to nextstrain.org/sars-cov-2/. SARS-CoV-2, since its emergence, has been evolving in real-time. Nextstrain analyzes SARS-CoV-2 sequences from labs around the world and organizes them into phylogenies. You’ll be able to explore phylogenies like this one

You can show your students a movie showing how this phylogenetic tree grew over time, branching from common ancestors to descendants. And then you can follow that up by having your students consider questions like: how is a phylogenetic tree like this get put together? How does the program know who’s most closely related to whom?
Once you’ve got your students motivated, you can have them go to learn-biology.com. The topic is captured in three tutorials.
Topic 7.9, Part 1: Naming and Classifying Species
Though it’s not in the objectives listed above, this tutorial teaches something essential to biological literacy: binomial nomenclature and classification.
If you’re super-pressed for time, you could skip this…
Topic 7.9, Part 2: Clades and Phylogenetic Trees
This tutorial connects phylogenetic trees to the idea of adaptive radiation, using diagrams like this to introduce concepts like clade and node.
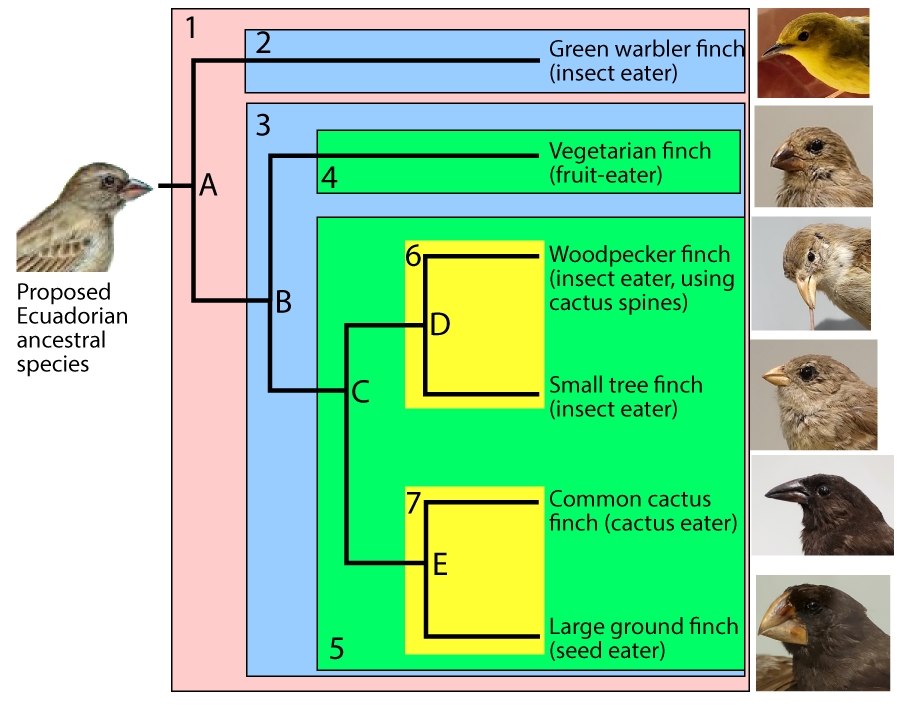
The tutorial goes on to teach essential concepts like shared derived features and ancestral features.
One goal of this section is to communicate how the top to bottom (or left-to-right) order of clades in a phylogenetic tree might have nothing to do with relatedness. The two trees below, for example, are equivalent, and frogs are no more closely related to gorillas than they are to lizards (because frogs share their most recent common ancestor with both gorillas and lizards at node C).
In other words, this…
![]()
is equivalent to this:
![]()
Along the way, students get lots of practice in analyzing (and even building) phylogenetic trees. Here’s an example of a sample exercise.

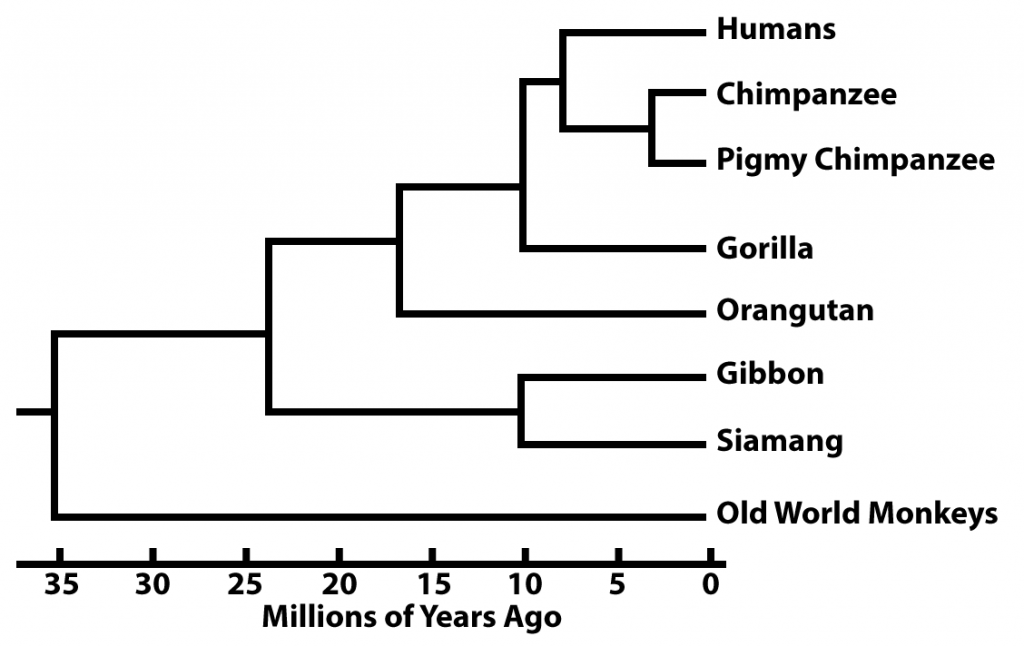
Topic 7.9, Part 3: Clades, Taxonomy, and Molecular Clocks
This tutorial gets into some of the finer details of phylogeny. The main focus is how molecular clocks can be used to determine dates of common ancestry.
Additional Resources for teaching phylogeny
Flinn’s POGIL on Phylogenetic Trees is very good.
Nova’s Evolution lab is excellent and will solidify your students’ understanding of phylogeny. However, it takes a lot of time. It’s been several years since I’ve done this activity so be sure to test it out. In addition, if you’re using it, be sure to have your students log in so that the program saves their progress.
Finally, I’d like to pass along an article from The American Biology Teacher by Professor Kristy Halverson about using pipe cleaners to teach phylogeny. Here’s a link to a worksheet/activity that implements Professor Halverson’s ideas, passed along to me by Kelley Derrick, a Learn-Biology.com using AP Bio teacher from Wausau Wisconsin. Thanks, Kelley!
Origin of Life (Topic 7.13)
A note about pacing
Keeping up with the pace of an AP Biology course can be brutal, both for teachers and students. If you’re behind where you want to be, then keep in mind that the Origin of Life module on Learn-Biology.com can be used independently by students with very little teacher support. The only prerequisite is that your students understand the Central Dogma (DNA makes RNA makes protein). So if you’re running behind a bit, assign this over Spring Break (or Presidents Day, or even Winter break). Then, after it’s due, spend a day or two going over key ideas in class.
Teaching the Origin of Life: General Considerations
Teaching about the origin of life can be challenging. A deep dive into the topic requires a lot of biochemistry. On top of that, we’re talking about events that occurred a very long time ago when conditions on Earth were wildly different from the life-sustaining world we live in today. By its very nature, the topic is more speculative than anything else we teach.
For me, the goal has been to offer students a naturalistic paradigm for approaching the origin of life. What I mean is that even though the topic is difficult and the evidence scanty, we can still approach it from a naturalistic framework. To quote Wikipedia,
Naturalism is the idea or belief that only natural laws and forces (as opposed to supernatural or spiritual ones) operate in the universe. Adherents of naturalism assert that natural laws are the only rules that govern the structure and behavior of the natural world and that the changing universe is at every stage a product of these laws.
The goal is to avoid what’s shown in this famous Sidney Harris cartoon below:

In other words, we’re playing by the rules of science. If we can’t figure out how something could happen based on the physics of the known universe, we have to go back to the drawing board, think harder, design better experiments, etc. Admittedly, at the high school or introductory college level, this is hard to do…
Origin of Life Learning Objectives
Here are the College Board’s objectives related to the origin of life:
- LO SYI-3.E: Describe the scientific evidence that provides support for models of the origin of life on Earth.
- SYI-3.E.1: Several hypotheses about the origin of life on Earth are supported with scientific evidence—
- a. Geological evidence provides support for models of the origin of life on Earth.
- i. Earth formed approximately 4.6 billion years ago (bya). The environment was too hostile for life until 3.9 bya, and the earliest fossil evidence for life dates to 3.5 bya. Taken together, this evidence provides a plausible range of dates when the origin of life could have occurred.
- b. There are several models about the origin of life on Earth—
- i. Primitive Earth provided inorganic precursors from which organic molecules could have been synthesized because of the presence of available free energy and the absence of a significant quantity of atmospheric oxygen (O2).
- ii. Organic molecules could have been transported to Earth by a meteorite or other celestial event.
- c. Chemical experiments have shown that it is possible to form complex organic molecules from inorganic molecules in the absence of life—
- i. Inorganic molecules/monomers served as building blocks for the formation of more complex molecules, including amino acids and nucleotides.
- ii. The joining of these monomers produced polymers with the ability to replicate, store, and transfer information.
- a. Geological evidence provides support for models of the origin of life on Earth.
- SYI-3.E.2: The RNA World Hypothesis proposes that RNA could have been the earliest genetic material.
- SYI-3.E.1: Several hypotheses about the origin of life on Earth are supported with scientific evidence—
- When did life emerge?
- There’s geological evidence that Earth formed about 4.5 bya.
- There’s biological and geological evidence that life was well established by 3.5 bya
- Based on geological and biological evidence, life probably first emerged on Earth about 3.8 bya.
- Where and how did life emerge?
- Conditions in a few locations on the early Earth would have made the abiotic formation of biological monomers possible.
- A consensus view is emerging that the most likely spot for that to have happened is alkaline hydrothermal vents.
- Additional pre-biotic molecules could have come down from space (but this is not nearly as plausible as the hydrothermal vents)
- The formation of monomers would have to be followed by the formation of polymers.
- Next would be the formation of self-replicating polymers. This, admittedly, is the biggest gap in the story.
- At some point, the encapsulation of self-replicating polymers within a lipid bubble led to the formation of cells.
- Chemical experiments have validated some of the earliest steps required for the emergence of life
- Organic monomers, including nucleotide precursors and amino acids, can be formed under abiotic conditions
- The next step —creating complex self-replicating polymers — has not yet been achieved, but there are promising approaches.
- The RNA world hypothesis promotes the idea that RNA, rather than DNA, served as the first genetic material.
Teaching about the Origin of life on Learn-Biology.com
Our tutorials on Learn-Biology.com cover this material in four tutorials.
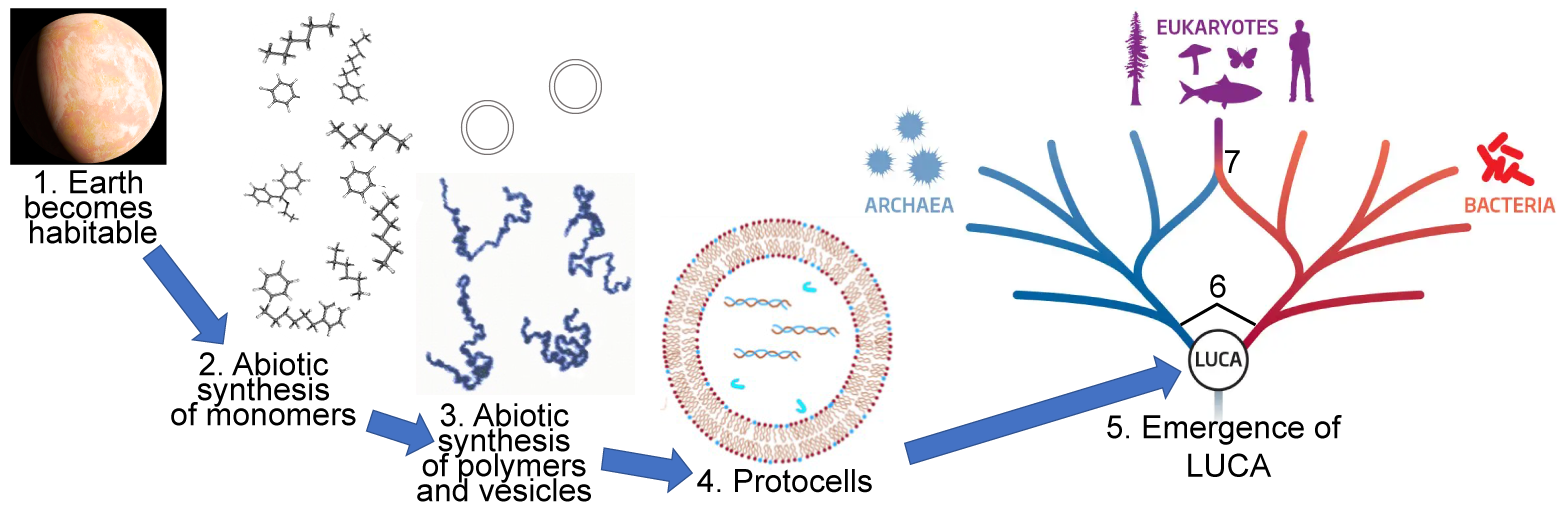
1. Topic 7.13, Part 1: Origin of Life Overview
This tutorial addresses the issue of when life began, how we know when life began, and some general considerations about what’s involved in explaining the emergence of life. Your students will gain mastery of the steps required for life to arise, as captured in this diagram.
2. Topic 7.13, Part 2: Abiotic Formation of Monomers and Polymers
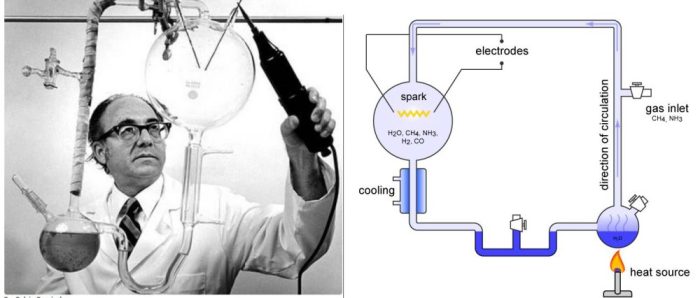 This tutorial focuses on scenarios for the abiotic production of monomers. We review Stanley Miller’s classic origin-of-life experiment, which is significant in terms of its overall conclusions (abiotic formation of monomers is possible), even though its underlying assumptions were somewhat flawed.
We also address the much more difficult problem of how these monomers could have combined to form polymers.
3. Topic 7.13, Part 3: the RNA World and the formation of cells
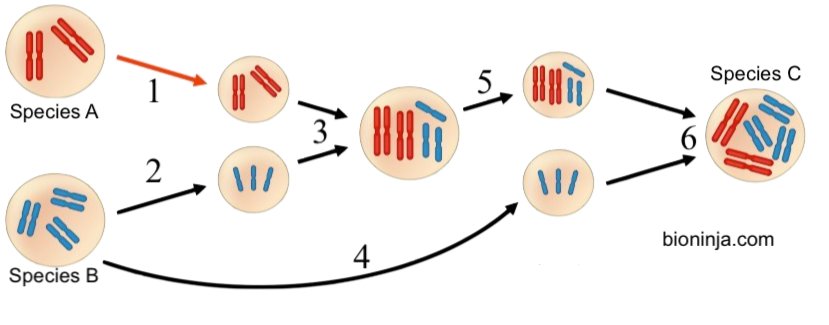
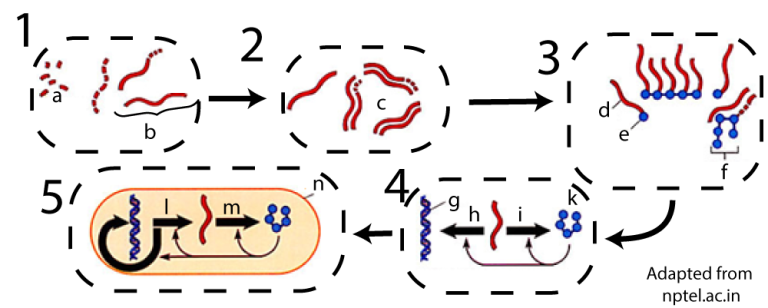 This tutorial will help your students understand why RNA, not DNA, was probably the first genetic molecule. Interaction with diagrams like the one on the left will enable your students to understand how RNA monomers could become RNA polymers, then associate with amino acids, then become encapsulated and ultimately associate with DNA.
Additional Resources
My tutorials use a fair amount of video. One that I use extensively can be seen at this link on Youtube. There’s also one that has more polished narration and animation that you can watch here. I’m not sure if either one escapes the “and then a miracle appears” problem, but both of these are worth watching several times and discussing with your students.
To do this, you can use this Google Slideshow presentation, where I’ve embedded the videos. As you present, you can use this guided note-taking sheet.
If you’re looking for more classroom activities, the National Center for Case Study Teaching in Science has two Origin of Life Case studies.
- The Spark of Life focuses on the Miller Urey experiment
- Replication or Metabolism guides students through a debate on which arose first: replication or metabolism.
Summative Activities for Unit 7
To pull together Unit 7, you can use send your students to the Unit 7 Cumulative Objectives, Quizzes, and Flashcards. Unit 7 is huge, and these interactive activities will help you set up your students for mastery. All of these are also available through our Biomania AP Bio app. And, as always, have your students complete the progress check questions for Unit 7 on AP Classroom.