The lessons on this page will show you how to set up your classes, enroll your students, check your students’ scores, and organize your scores report.
If you’re a new teacher, click here to start.
Returning Teachers: Use these steps to set up for a new school year
Welcome back! Here’s how to get up and running. Your first move is always going to be to log in to your teacher account at Learn-Biology.com/login.
1. Remove last year’s classes. The first thing you’re going to want to do is to remove last year’s classes. Note that we never delete student data.
After logging into your account on Learn-Biology.com/login, go to “Edit students/Classes” and click the “Remove class” button. Repeat this for all of the classes you had last year.

2. Set up your new classes: This is slightly different from last year.
Click the “Add New Class” button. Give your new class a name, a registration code, and pick a course (that’s what’s new). The Course pulldown in in the red rectangle below. Your choices are
- AP Bio v2.0 (for AP Bio teachers)
- HS Bio (for teachers teaching a non-AP high school bio class). Click here to learn more.
- College Bio (for professors teaching an introductory College level biology course).
 Click “Go” and you’re set. To remind yourself about how to enroll students in your class and check scores, use the New Teacher tutorials immediately below.
3. Recommended Moves for returning teachers
As you set up for the coming year, you might want to eliminate some unit in our predefined curricula. Click here to see how to
- Drop modules that you don’t want your students to do.
- Set dates to your assignments.
New Teachers: Use these steps to get started
- Setting up your classes and enrolling your students
- Giving your students assignments
- Checking Scores
- Using Manage Quizzes/Decks to organize your curriculum
LESSON 1. Setting Up Your Classes and Enrolling Your Students
Your account at learn-biology.com/login is what you’ll use to set up your classes and assign quizzes and flashcard decks to your students. To get started, you need to set up your classes and enroll your students. It’s incredibly easy
To start, log into your account at learn-biology.com/login. After that, it’s 3 steps.
STEP 1: Click the “Add new class” button.

STEP 2: Give your class a 1) a name, 2) a registration code, and 3) a level (AP bio, HS Bio, or College).
- Give your class a name by typing a name into the “New Class Name” field.
- Then make up a registration code. This code can be anything that’s unique in our system, and we’ll let you know if it’s not.
- Choose a level for your class. Choosing a level will load a preset curriculum of quizzes and flashcards into your class.
Here’s a sample of what you might enter if you were setting up an AP Bio class.

Then click the “Go” button.
Congratulations! You’ve set up your first class. A successful result is shown below.

If you have two or more classes, just repeat steps 1 and 2 above. If your second class was a high school (not AP) biology class, you’d do something like what’s below.

After clicking “Go,” you’d see this:

STEP 3: Now you have to get students into your class. The way you do that is by giving your students your class’s registration code and sending them to our registration page. If you’re in the room with them, just write both on the white board, give them a computer, and have them register. Here’s what to put on the board.
- Registration link: learn-biology.com/register
- Registration Code: whatever you set up in the previous step(s). In the example above, the code of the AP class we just set up is “MrWAP2021.” The code for the high school class was “MrWBio92021.”
When your students get to the registration page, what they’ll see is this.
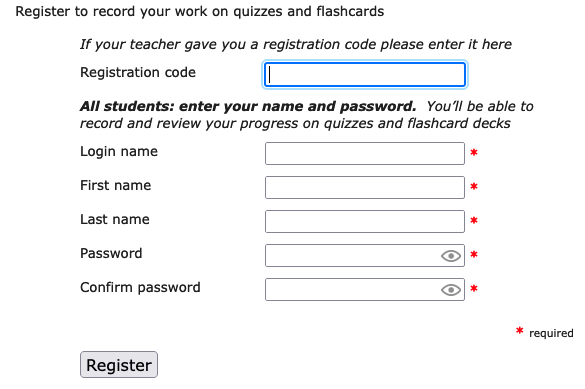
Instruct your students to enter your class registration code into the “Registration code” field, and then to fill in the rest of the information. When they hit the “Register” button, they’ll be in your class.
Please note that we don’t collect email addresses. That’s because of concerns that many districts have regarding student privacy. In terms of names, you can collect as little (or as much information) as you need to identify your students (so that you can track their work on our website).
A sample email for remote registration
If you need to, you can easily enroll your students remotely (which is what hundreds of teachers did during the 2020-21 Pandemic school year). Just cut the text from the sample email below, adjust as needed, and send it to your students.
Dear Students,
We’re going to start working on a series of online, interactive lessons on a website called learn-biology.com. In order to be able to do this, you need to register in a form at a companion website (learn-biology.com/register). Registration is how you’ll be able to complete the interactive quizzes and flashcards. It’ll also let me give you credit for the work you’ve done (because I’ll be able track the work that you’ve done).
To register, please go to
When you get there, please enter “[YOUR CLASS CODE]” into the “Registration Code” field at the top. Then fill in the rest of the information and click the “Register” button.
That’s it. Please take care of this as soon as possible. I’ll be sending you instructions for our first activity in the next email.
Thanks!
YOUR NAME
That’s it. Next time you’re in learn-biology.com/login go to “Edit students/classes.” Your classes should be filled with your registered students.
Lesson 2: Assigning Your First Assignment
Once you’ve set up your classes, the next thing to do is to assign work.
The best way to do that is to use the student learning guides we have for each tutorial. You can access these guides from the main menu for your course. Use the “Courses” menu above.
The learning guides are handouts that guide your students through the tutorials. As your students use them, they’ll do things like summarize what they’ve learned, label diagrams, or compare one process to another. They’re in Google Docs format, which makes them very easy to distribute and to evaluate. Each one ends with a crossword puzzle, which is not only fun, but very good for vocabulary review.
You can assign work without these learning guides, but because they make the learning deeper and more substantial (and because they make the process so easy), I’m going to start by showing you how to assign work with a student learning guide.
If you’re in person with your students
- Make a hard copy of the student learning guide and give it to your students. Alternatively, you can have them access the student learning guide electronically.
- Tell your students to use the main menu for your course to find the learning module.
- Tell you students that when they get to the 1st quiz or flashcard deck, they should sign in with the username and password that they set up when they registered. For example, if your students were working on our 1st module, Biology Core Concepts, they’d start with our AP Biology Themes/4 Big Ideas tutorial. After watching an introductory video and reading some text, they’d arrive at this quiz:
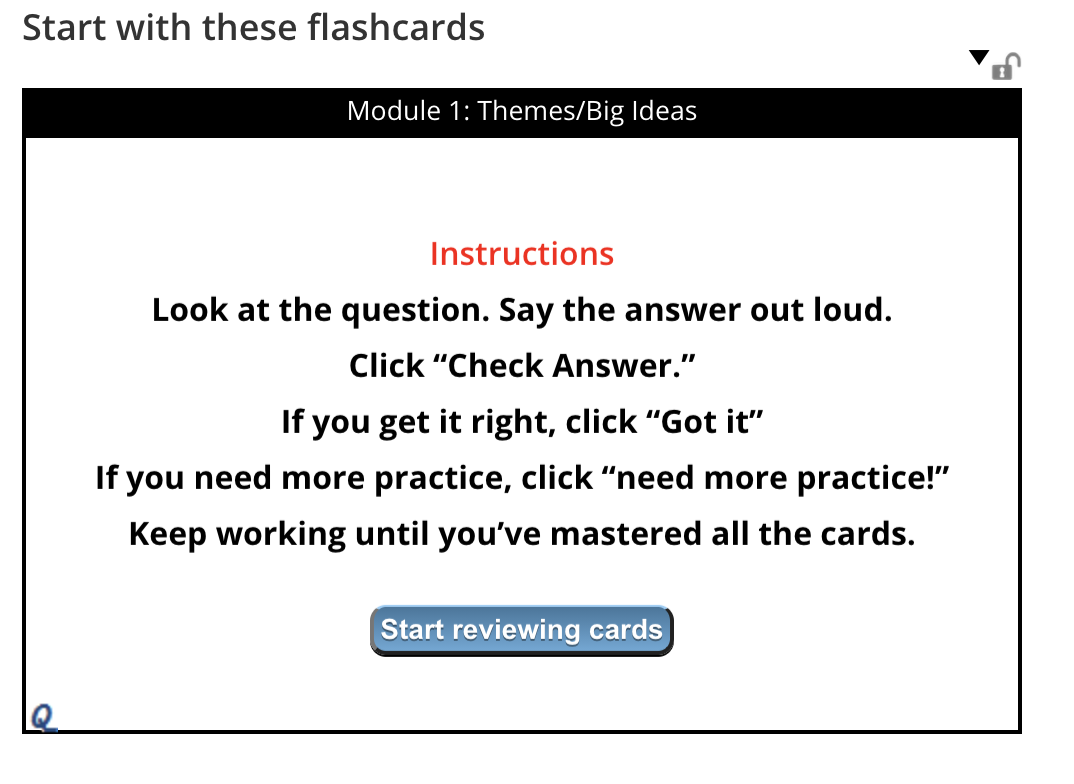
If they clicked the “Start reviewing cards button,” or clicked on the triangle on the top right, they’d get to this login screen:
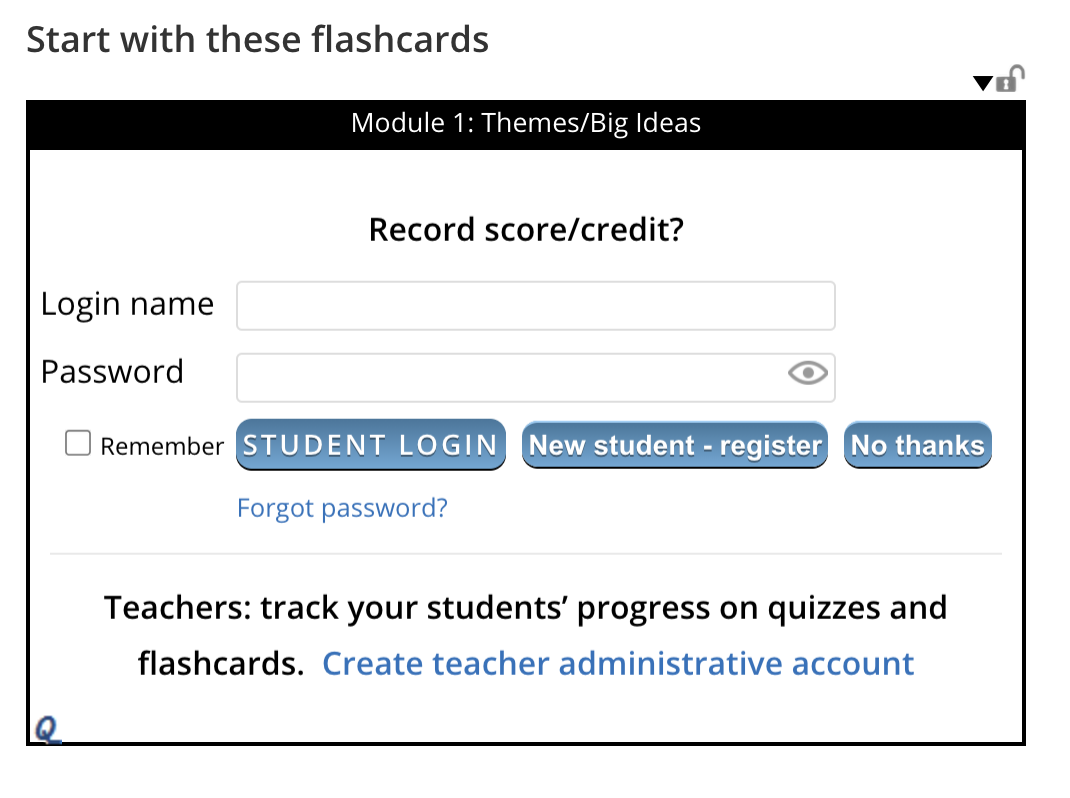
They enter their login name and password, click “student login,” and they’re set. Their login will persist for 24 hours on the same device, and they’ll repeat this procedure every day they use Learn-Biology.com
If you’re assigning work remotely, do the following
STEP ONE: Set up a blank email to send to your students.
STEP TWO: Get links to your first assignment, and to the associated student learning guide. You’ll find both on the menu for your course. For example, if you’re teaching AP Bio, and you wanted to start the year with our “Course Introduction” Module, you’d go to our Learn-Biology.com AP Bio Main Menu
Right at the top you’ll find Biology: Course Introduction | Biology Core Concepts Student Learning Guide.
STEP THREE: Compose your email and send it to your students
Put together an email with instructions to your students. The email should include both links. Just tell your students to use the student learning guide to complete the tutorial. Let your students know that you’ll be able to check on their completion of all the quizzes and flashcards that they’ll do as they complete the student learning guide. If you want to, you can also tell them that you’ll evaluate the learning guide itself.
Here’s a template for an email. If you’re starting with another module, then replace the topic and learning guide links as needed. Replace the material within brackets as needed.
Dear Students,
Today, we’re going to learn some biology at a website called learn-biology.com. This is the website that I asked you to register for in my last email. If you haven’t done that yet, please go to https://learn-biology.com/register and complete the registration form.
Your job is to complete an interactive learning module entitled Biology: Course Introduction which you can find at the preceding link.
This Biology Core Concepts Student Learning Guide will guide you through this module. You can print it out and write out the answers, then scan it and email it back to me. Or you can complete the whole thing electronically.
The module has short readings, followed by quizzes and flashcards. As you read and complete the quizzes and flashcards, complete the handout as well. When you get to the first quiz, you’ll have to sign in with the login name and password that you set up when you registered.
Your assignment is to complete this entire module. You’ll need to complete each of the quizzes and flashcards on each page. In these quizzes, if you get questions wrong, they come back to you, so keep working until you’re done. I’ll check your work online on [date]. I also want you to email the completed student learning guide back to me, and I’ll grade that too.[or submit it to me via Google Docs or Classroom, etc.]
Sincerely
[YOU]
Just cut and paste that into an email of your own, making whatever adjustments you need.
That’s it. Send that email to your students, and you’ve assigned them work. There’s nothing else to do. I’ll show you in the next video how to check their scores with our teacher tools.
ALTERNATIVE METHOD: NO STUDENT LEARNING GUIDE
Use the Tutorials menu to find the learning module that you want your students to complete.
If you’re in person, tell your students where to go. If you’re working remotely, paste the web address of the module into an email, and send it to your students. In your email, tell them that you’ll be able to check on their completion of all the quizzes and flashcards that they’ll do as they complete the module.
So, ASSIGN SOME WORK. IN the next lesson, I’ll show you how to check students’ scores.
Lesson 3. Checking Students’ Scores
In the previous two lessons, you
- Enrolled students in your classes.
- Assigned work.
In this lesson, you’ll learn how to check students’ scores.
Start by logging in to your account at learn-biology.com/login
The default view should be “view scores.” But if it’s not, just click the “view scores” tab in the top left of your screen
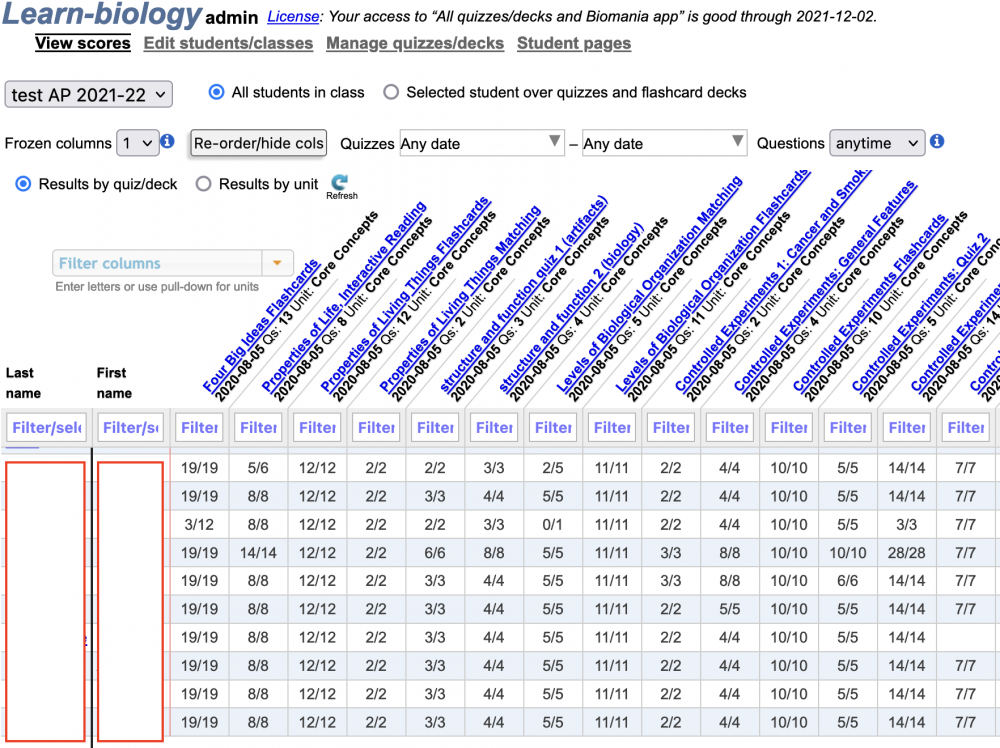
Here’s what I’m seeing for the first module in Learn-Biology.com’s AP Bio curriculum. You’ll see your students’ names on the left (blanked out here for privacy). The columns with the slanted blue text have the name of each quiz, the date you assigned it, the number of questions, and the name of the unit that this quiz is in.
The student score that’s shown below the column header is presented as a fraction. The numerator is the number of questions the student answered correctly. The denominator is the number of questions the student attempted. (If the student does the same question more than once – perhaps because a previous attempt was incorrect — that counts as “one question attempted.”) Note: the denominator is not the number of questions.
View by Unit is my preferred view
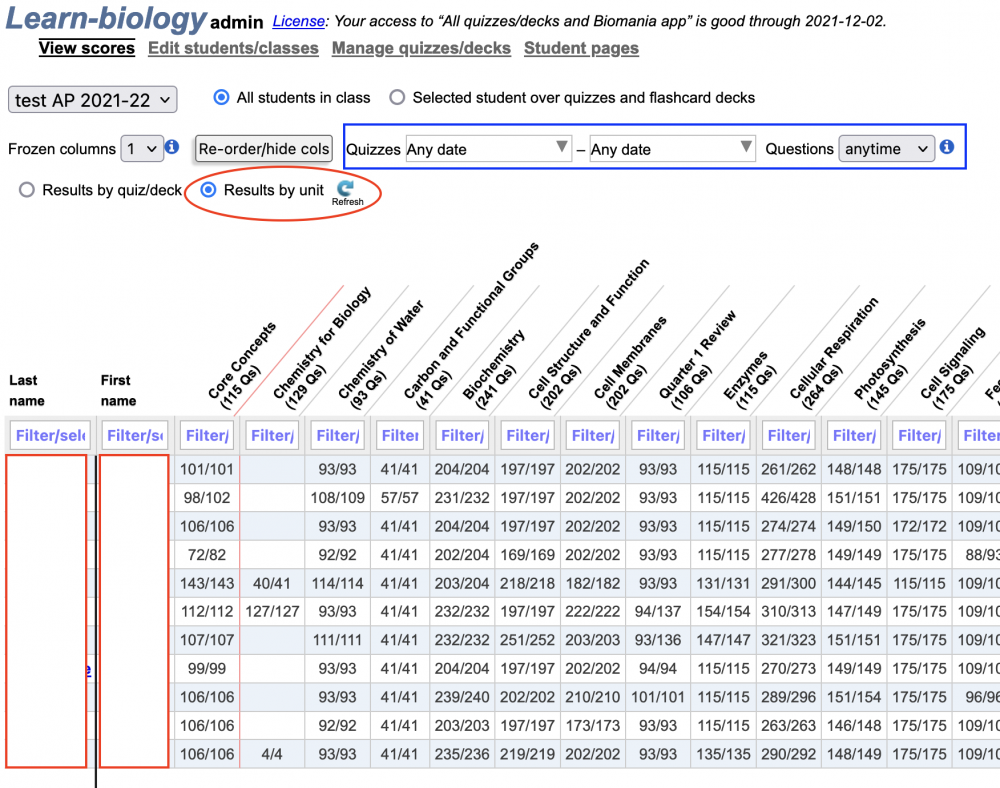
When I want to record my students progress on Learn-Biology.com in my grade book, I almost never enter grades for individual quizzes. Instead, I view my students’ performance on an entire unit. Note that on Learn-Biology.com, a “unit” corresponds to what would be a “chapter” in a typical textbook (such as Photosynthesis or Cell Division).
To view by learn-biology.com units, instead of individual quizzes, click the unit button (circled in red). You can also filter by the start date and time (inside the blue rectangle).
Reorder and Hide Columns
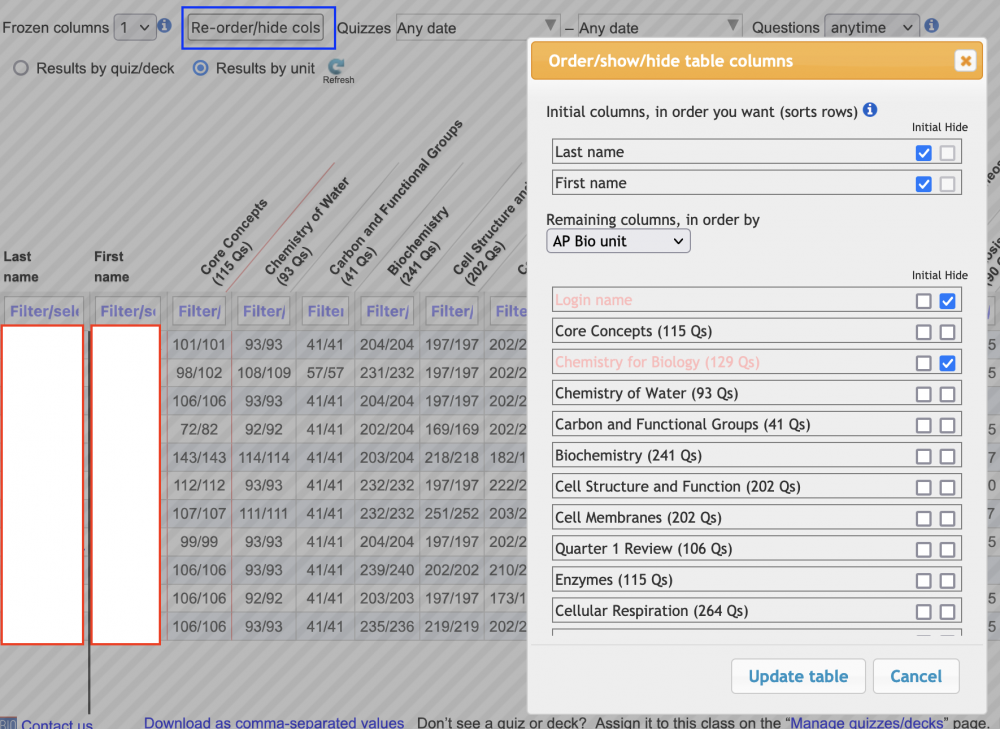
If you want to adjust the order of the columns (for either units or quizzes), click the “Re-order/hide/cols” button (in the blue rectangle). That brings up the window below.
- Click the “initial” checkbox to bring an item up to the top.
- Click “hide” to hide it.
- Drag units up and down until they appear in the order you want.
- Click “Update Table” when you’re done.
Single Student View
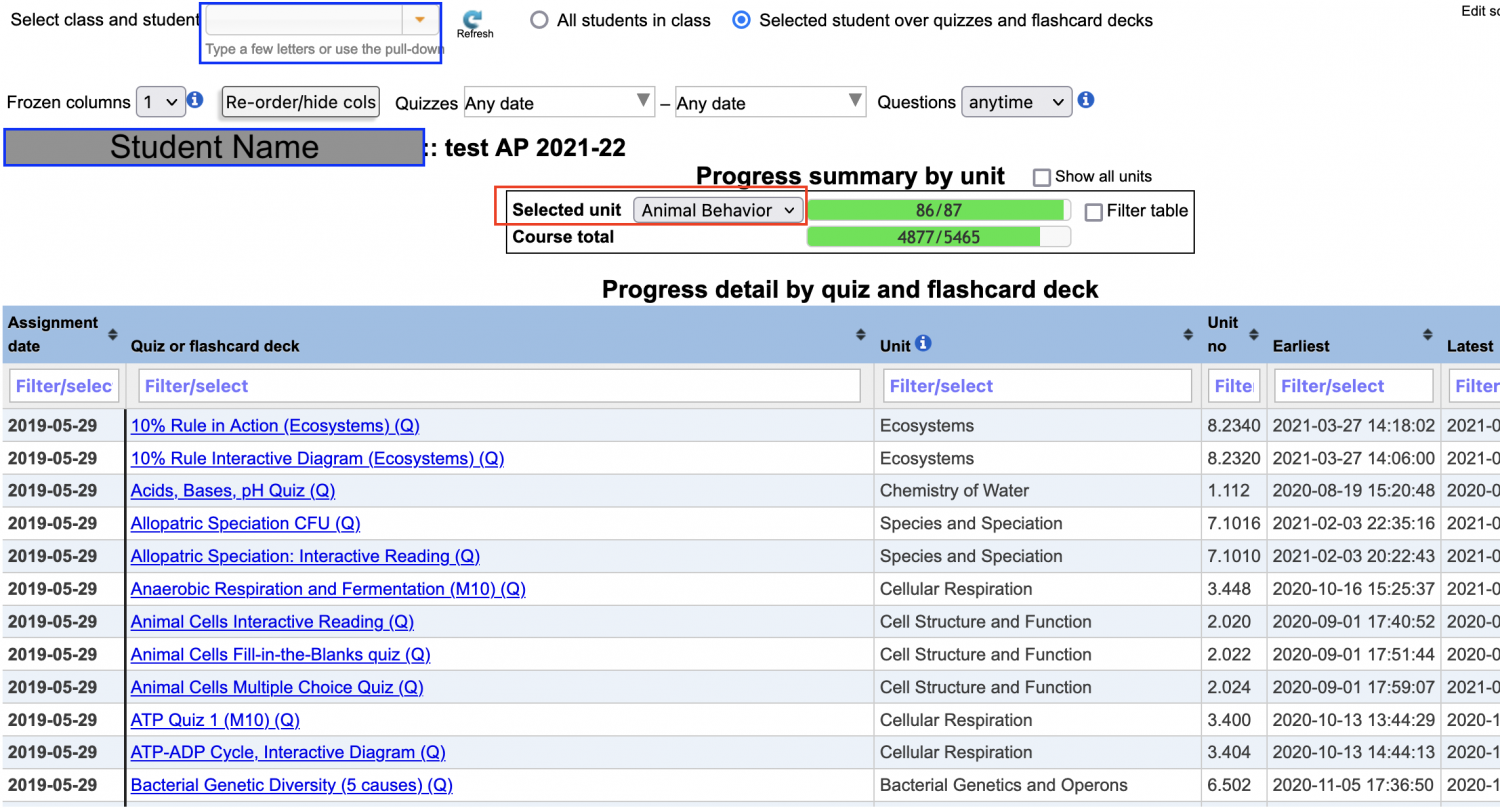
When you’re looking at your students’ scores, you’ll notice that their last name is a hyperlink, colored blue (this is not shown above for privacy reasons). To see a single student’s scores, click their name. This brings up a single student view, shown below.
To jump from student to student, use “Select class and student” (in the blue rectangle). To show a score from a particular unit, use the “Selected unit” pulldown (in the red rectangle). If you just want to show the quizzes in a particular unit, check the “Filter Table” checkbox (it’s to the right of the “Selected unit” pulldown menu).
For a fantastic progress report, click the “Show all units” checkbox next to “Progress summary by unit.” You get this:
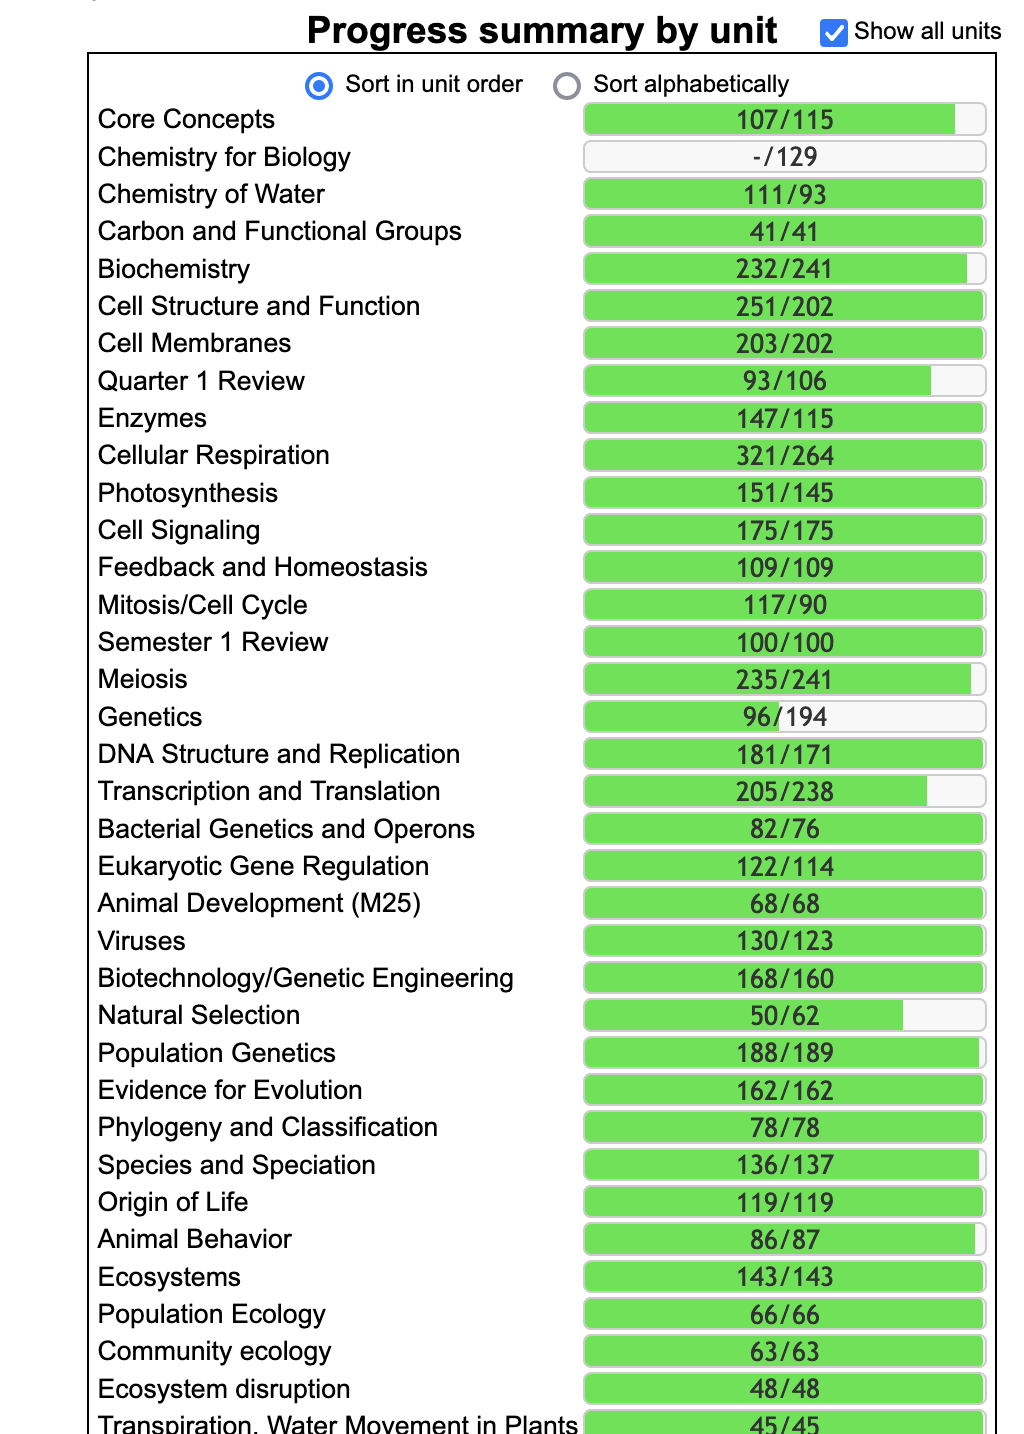
If a student has a question about their progress on Learn-Biology.com, I direct them to this view (and often take screenshots that I drop into emails to parents).
Do you see how this student has a score of “-/129” for our “Chemistry for Biology” unit? That’s because I never assigned it. You can use “Manage Quizzes/Decks” to customize the curriculum in a way that can be super-motivating for your students.
Before we go there, note that students can see their scores in a view that’s identical to what’s shown above. They can access their scores from within any quiz through a “My Scores” link. While checking scores is very easy, we’ve even provided a tutorial for your students about how to do it, which they can access on this page (there’s also a link to this page on the right sidebar that’s on almost every page on the site). Encouraging your students to check their own scores (and to become responsible for their own progress) will save you a lot of time.
Lesson 4. Using Manage quizzes/decks
Remember how the score report above showed scores for “Chemistry for Biology,” even though I didn’t assign it to my students? If you want to customize your curriculum on Learn-Biology.com, you can do this through the “Manage Quizzes/Decks” tab.
Dropping Units
Let’s start by dropping a unit. If you’re an AP Biology teacher, and your students have already taken a chemistry class, you might want to drop our “Chemistry for Biology” unit.
What you’re going to do is Filter, Select, and Set.
Follow the steps in the video below.
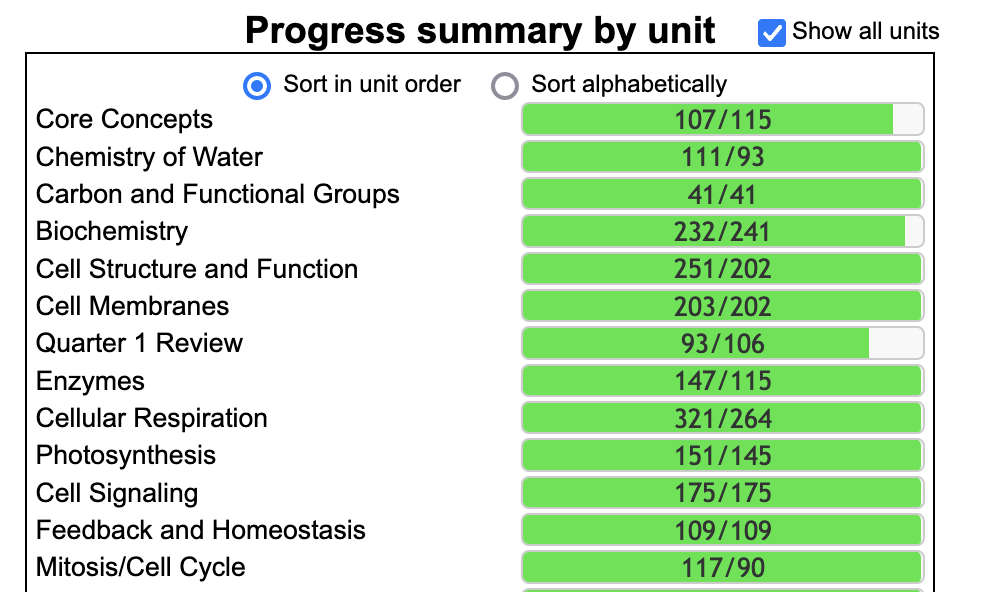
As a result, “Chemistry for Biology” is no longer assigned to my students.
If you compare this report to what’s above, you’ll see the difference
Assigning Dates
To make the “View scores” view in Learn-Biology.com/login look manageable, I suggest that you assign dates to the quizzes you assign to your students on an ongoing basis. Here’s how.
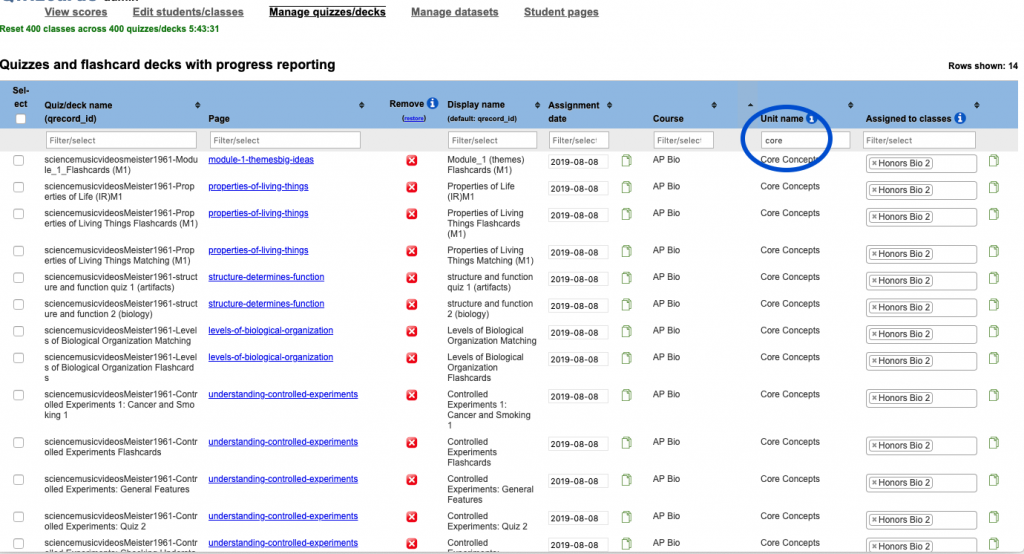
STEP 1: Start by selecting a unit. You do this by typing the name of a unit in the field I’ve circled in blue below. You can scroll the list to see the names of all the units.
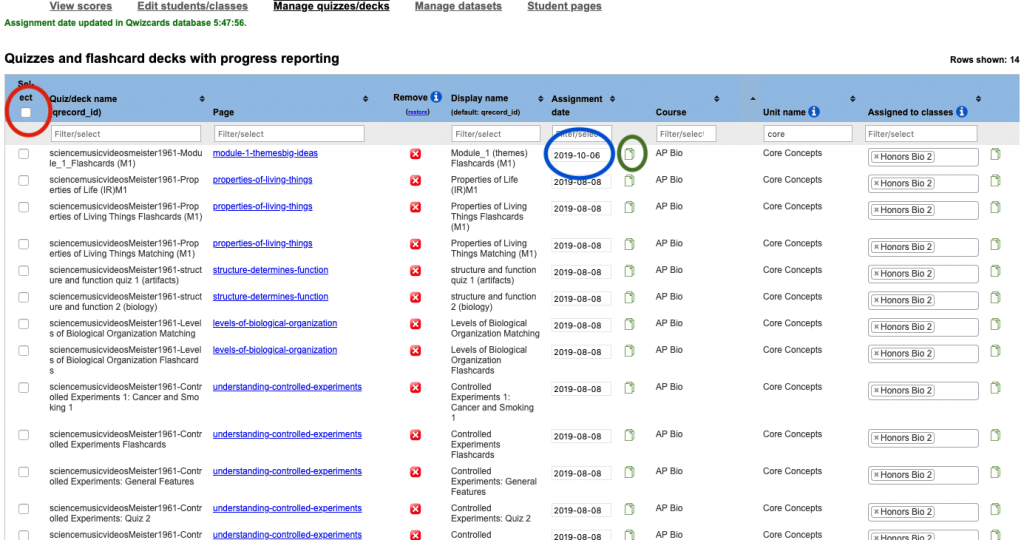
STEP 2: In the top row of this selection, change the date (blue circle below). Then select the entire set by clicking the checkbox on the far left (red circle below). then click the green “date clone” button (green circle below) to clone this date to everything in the selected set.
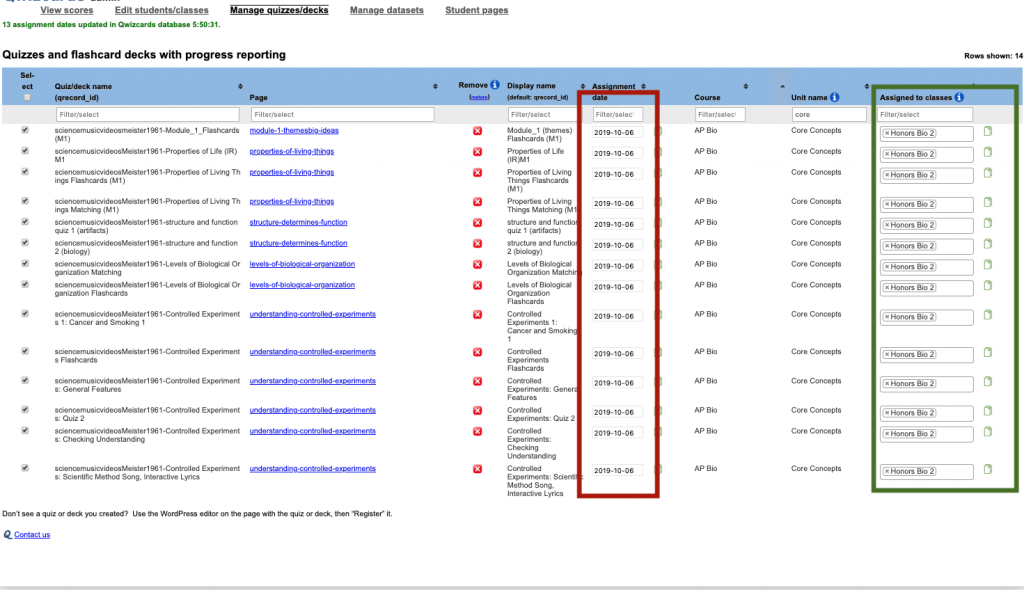
SUCCESS! Here’s what success looks like.
For all of the quizzes in the selected unit, you’ve assigned your classes and a date.
HELP IS AVAILABLE
If you need some help getting any of this set up, please contact Mr. W by clicking this link. I’m always happy to set up a call to help you get started, or just to talk about teaching biology.

