Unit 2 Table of Contents
- Sequencing Unit 2
- Surface Area and Volume, Cell Parts and Functions
- Cell Parts and Functions Continued, Membrane Structure
- Diffusion and Osmosis Labs
- Summative Activities for Unit 2
Essential Links
- The College Board’s AP Bio Course and Exam Description.
- Mr. W’s Ultimate AP Exam Review Outline: Takes the Course and Exam description and renders it into student (and teacher) friendly language.
- AP Bio Scope and Sequence Calendar: A spreadsheet that lays out the entire course.
Introduction: How to Sequence Unit 2
Unit 2 of AP Bio focuses on cell structure and function. It’s a lot of detail, but also super fun because it’s a very lab-rich unit.
In terms of sequence, I suggest that you don’t follow the College Board’s sequence. Instead:
- Start with Topic 2.2 (Cell Size), which revolves around the agar cube surface-area-to-volume lab. Note that the 2025 revision of the College Board’s AP Bio Course and Exam Description moved metabolic scaling (the connection between body size and metabolic rate) from Unit 8 to Unit 2.
- Follow this with Topic 2.1, Cell Parts and Functions, which revolves around several class periods of microscopic observations of cells.
- In the second week of this unit, you address Topics 2.3 – 2.8, Cell Membrane Structure and Function (including osmosis).
- In the 3rd week you teach about cell compartmentalization and the evolution of Eukaryotes (Topics 2.9 and 2.10). Then review, then test.
Teaching about Surface Area and Volume
Objectives for Cell Size (Topic 2.2)
Use link # 2 above.
Start with the Cell Size/Surface Area-to-Volume Lab
To teach about surface area-to-volume relationships, I suggest that you do the surface area-to-volume lab first (the link goes to a lab handout). After the lab, use our tutorial to consolidate what’s learned in the lab. In this lab, your students will use phenolphthalein agar cubes, cut to various sizes, and measure the amount of diffusion that happens in a given period of time. The lab is great, and it’ll communicate the concepts related to the lab in a very powerful (and very fun) way.
If you can’t do the lab, I’ve made a video about it that I embedded into the Surface Area: Volume tutorial on Learn-Biology.com.
Here’s a recipe for making the agar cubes. I like to start with cubes that are alkaline and have the students pour vinegar to make them clear (which is much safer than having the students pour NaoH). Note that the agar needs to set, so you’ll want to do this a day or two before you do the lab.
CAUTION: Wear a hot glove and take all needed safety precautions when you’re working with the heated agar to prevent burns.
A 12″ by 9″ baking pan will require about 2.5 liters of solution to get to a depth of 3 cm. That should be enough to cut 18 3cm x 3cm x 5 cm cubes. If you organize your lab groups into groups of 4, than that’s enough for two classes of 36 students
- Prepare a 2.5% solution of agar.
- You do NOT need lab grade agar for this. Food grade agar, available on-line and at many Asian grocery stores, is much cheaper than lab-grade agar, and it’ll work perfectly.
- Mix 75 g of agar with 2.5 L of water. I’ve always used tap water for this (no need to buy distilled water).
- I use a non-stick soup pot to melt the agar. Heat almost to a boil. Stir frequently. If you have one, use a heater-stirrer and a stir bar.
- Remove from heat and add 10 mL of 1% phenolphthalein solution. Keep stirring.
- 1 g phenolphthalein in 100 mL 95% ethanol
- Stir in enough NaOH until the agar turns bright pink. You can use almost any concentration of NaOH.
- Pour the melted agar/phenolphtalein/NaOH into a baking pan to a depth of 3 cm and allow it to set (overnight).
- The next day, remove the agar from the baking pan (which can be a little tricky!) and then cut it into 3cm x 3cm x 5cm pieces for distribution to your students. Keep the cubes in a dilute solution of NaOH so they don’t dry out and so they don’t lose their color.
Since you’ve just taught about standard error, there’s a great opportunity for a lab extension (which is not part of the handout). Collect measured data from multiple groups, work out an average, calculate standard error, and graph the data with error bars. It’ll be interesting to see (and discuss) how observed values differ from expected values.
Then do the tutorial on Learn-Biology.com
Once you’ve done the lab, my tutorial, Surface Area, Volume, and Life, will help your students consolidate their learning. The tutorial includes an embedded video. You can access both, and the associated student learning guide, on the Unit 2 Main Menu. Note that in the 2025 Course and Exam description, the College Board added metabolic scaling to Unit 2 (it was previously in unit 8).
Completing the activities in the cell size lab and going over it can take up to two class periods. That leaves you the rest of the week for Cell Parts and Functions (Topics 2.1, 2.9 & 2.10).
Teach about Metabolic Scaling
Largely because of surface area:volume ratios, energy use in endothermic organisms (mammals and birds) scales in a curious way.
If you graph the relationship between body size and energy use in mammals, you can see that energy use goes up as body size increases.
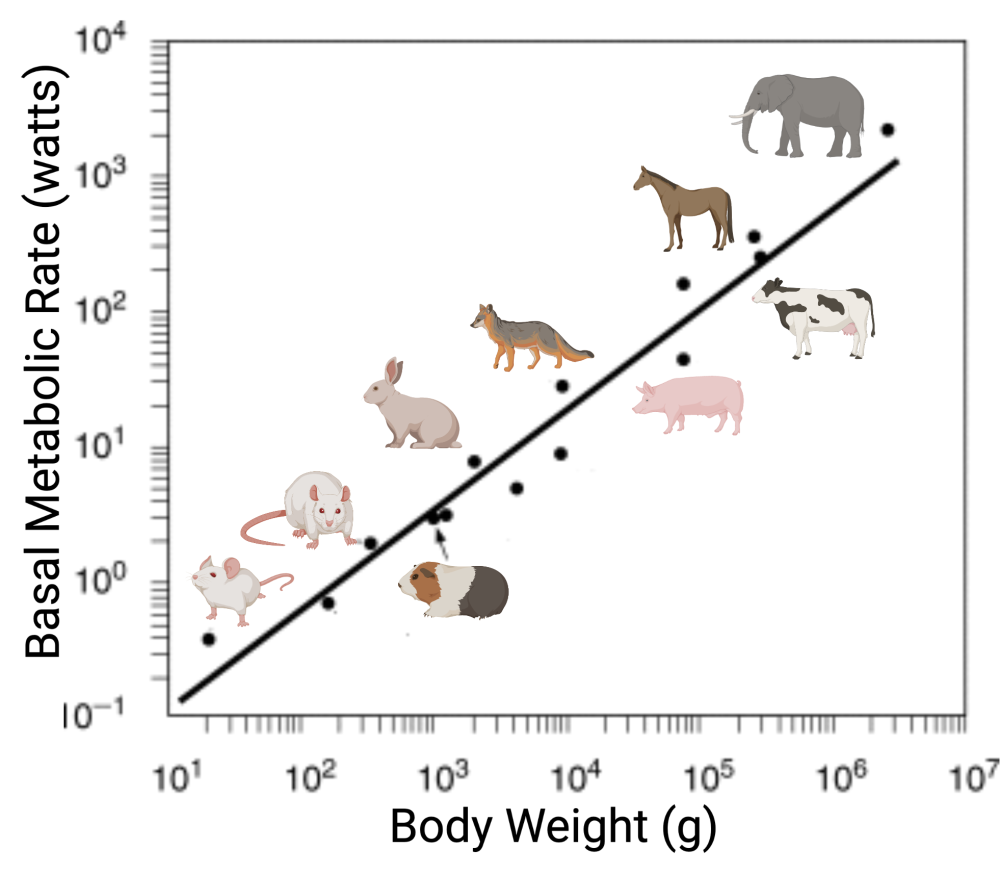
That makes sense, right? You’d expect that the energy required to sustain an elephant would be much more than the energy required to sustain a smaller animal (like a pig) or a mouse.
But what’s fascinating is that as an animal’s mass increases, its metabolic rates/gram of tissue decreases. A gram of tissue in a shrew (the smallest mammal) is burning through energy a million times faster than a gram of elephant tissue does. When graphed, that relationship looks like this:

The reasons for this are largely (but not entirely) related to surface area: volume ratios. For a deeper dive into this material, I strongly suggest that you read this archived article from the NY Times (from 1999: no subscription needed).
Cell Parts and Functions
Objects can be found at essential Link # 2 above.
Cell Parts and Functions Tutorials on Learn-Biology.com
To teach the material above, use these tutorials, which are supported by a continuation of the same student learning guide you used for Surface Area-to-Volume.
- Topics 2.1 – 2.2, Part 1. Introduction to Cells
- Topics 2.1 – 2.2, Part 2: Animal Cells: Parts and Functions
- Topics 2.1 – 2.1, Part 3: Plant Cells: Parts and Functions
Other resources for teaching about cell parts and functions
The highlight of this topic is viewing cells through a microscope. Here’s the lab handout that I use.
When teaching about cells, it can be difficult to give students a sense of how dynamic cells are. To communicate that, I like to start with this excerpt from Bill Bryson’s A Short History of Nearly Everything (which is a fabulous survey of pretty much all of science: I can’t recommend it highly enough).
After my students do the tutorials, I do a lot of careful checking for understanding. That involves interspersing readings from this outline (a continuation of the Bill Bryson reading above) with other cell-related that I usually put on a slideshow. Note that we’ll be using the same handout next week.
Cellular Comparmentalization
In the previous week, you taught about the parts of cells and their functions. Through the Surface Area and Volume Lab, the tutorials on Learn-Biology.com, and the Viewing Cells Lab, you’ve established why cells are small (and established the basis for understanding a host of other adaptations).
We’ll start this week by finishing cell parts and functions. What’s left is the endomembrane system of eukaryotic cells. Explaining the origins of that system involves diving into the emergence of eukaryotic cells about 1.8 billion years ago. Our understanding of that process is usually credited to Lynn Margulis. While Margulis wasn’t the first biologist to propose that mitochondria and chloroplasts are endosymbionts — the descendants of once-independently living bacterial cells that took up residence inside another prokaryotic (probably archaeal) cell— she was that theory’s main modern proponent. It’s definitely worthwhile to learn more about her.
As to how that endosymbiosis happened, I follow Chapter 2 of Nick Lane’s Life Ascending. Nick Lane is the best: he’s a biochemist who writes for a biology-savvy general audience. His books are perfect for high school biology teachers and college faculty. You might be too busy to read that book right now but put it on your summer reading list.
The basic idea is this: about 1.8 billion years ago, two ancient prokaryotic cells (1 and 2 below) lived in close association, each consuming the other’s metabolic waste products. Cell 1 was an archaeal cell. Cell 2 was a bacterium. At some point, the bacterial cell slipped inside the archaeal cell, creating cell 3. Secretion of vesicles (a) from the bacterial cell led to the formation of what would become a nuclear membrane around the genetic material of the archaeal cell. Other vesicles would develop into the endomembrane system (at d) in what would become a eukaryotic cell (at 5)
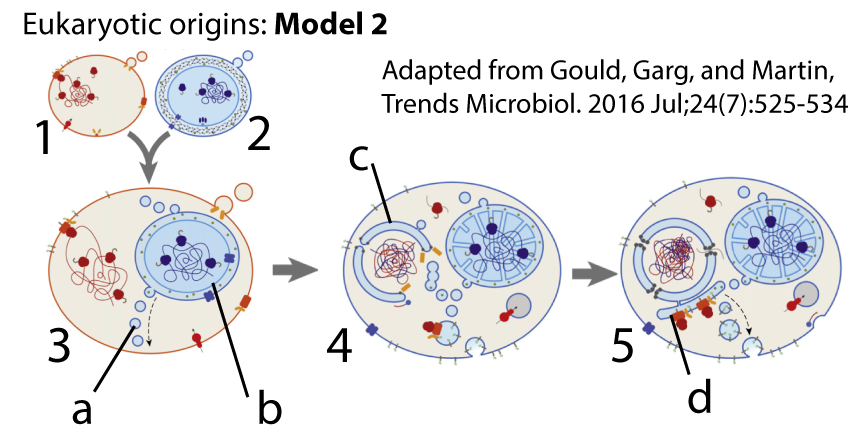
Note that this is somewhat different from how things are usually presented in textbooks. Check out my tutorial to see the difference.
For more on this, you can read this article by Carl Zimmer (written for the lay public, and completely accessible to any AP Bio student). You can also watch a great video abstract of a much more detailed paper (which is unfortunately behind a paywall).
Cell Compartmentalization/Endosymbiosis Tutorials on Learn-Biology.com
These tutorials are linked off of the Unit 2 Main Menu or they can be accessed directly through the links below,
- Topic 2.10: The Endomembrane System: ER, Golgi, and Lysosomes
- Topic 2.11: Origins of Cellular Compartmentalization
On to Membranes
Teaching about membranes is simultaneously fun and challenging. The fun is that there are a bunch of labs that usually work (meaning that they yield pretty clean, understandable results). We’ll do those next week. The challenge is that understanding how membranes work requires some molecular imagination on the part of students. That can be difficult without giving students a lot of practice with visual representations of membranes, and that’s where the tutorials on Learn-Biology.com can be of help.
Membrane Structure and Function Tutorials on Learn-Biology.com
If you’ve been following our AP Bio Scope and sequence (link is above) then your students should have already covered the structure of phospholipids in Unit 1. A fun fact for us biology teachers is that the phospholipid bilayer is not the universal basis for cell membranes. It’s what’s found in Bacteria and Eukarya. The cell membranes found in life’s third domain, Archaea, are built from a different lipid. Hang on to that until we get to the end of unit 7 and cover the origin of life.
Here are links to membrane structure and function tutorials on Learn-Biology.com
- Topic 2.4: Cell Membrane Structure
- Topics 2.5 -2.7, 2.9: Membrane Transport
- Topic 2.8, Part 1: Osmosis and Water Potential
Other Cell Membranes Related Resources and Activities
A fun way to preview what you’ll be doing next week with osmosis is a really simple (and fun) gummy bear lab. You might have already done this with your 9th-grade students (but we don’t have a 9th-grade biology class at my high school). If you’re interested, here’s the link.
Also, Flinn’s POGILs about membranes are excellent and highly recommended.
Diffusion and Osmosis Labs; wrapping up unit 2
In week 6, you established an understanding of membrane structure and function and osmosis. Now comes a series of important labs related to diffusion and osmosis.
Diffusion and Osmosis Labs
Here’s a link to the Diffusion and Osmosis Lab. This version of a “classic” AP bio lab uses four sucrose solutions (1.0M, 0.66M, 0.34M, and 0.0M) instead of the six (1.0M, 0.8M, 0.6M, 0.4M, 0.4M, and 0.0M) that are traditionally done. I think that this simplifying move will make your students more successful, and they will learn just as much. Even with this version, there’s a lot of material to set up, so read through the handout carefully. Note that you’ll probably vastly increase the chance of good results if you make up the 0.66 and 0.33 solutions ahead of time (instead of having your students do the dilutions).
In addition, I’ve also put together two virtual labs related to membranes and osmosis. If you successfully do the actual lab, they might be redundant. But just in case, here they are:
- Cell Membrane Model Demonstration Using Dialysis Tubing (Virtual Lab)
- Osmosis with Thistle Tubes (Virtual Lab)
I have several videos that’ll help you teach this material.
- Membranes: Structure and Function is built into the tutorial, but you might want to show it to your entire class, pausing for questions and checking for understanding along the way.
- If you want a musical version of the same material, you can use my music video Membranes!, which also has a Karaoke version. You can access both from the tutorial (the link is directly above).
- To reinforce concepts related to the labs, you can use these two videos.
- My music video Osmosis!, and its Karaoke version, provide a really fun way to help your students consolidate their understanding of osmosis.
Summative Activities for Unit 2
To help your students pull together what they’ve learned from unit 2…
- Have your students study the objectives for Unit 2, and work with the flashcards, multiple-choice questions, and Click-On Challenges. These are accessible on this page.
- Have your students complete the Unit 2 progress check items on AP Classroom.