Link back to the Teacher’s Guide Table of Contents
Unit 3 Table of Contents
- Introduction: Sequencing Unit 3
- Enzymes
- Cellular Respiration
- Photosynthesis: Also: starting Mitosis/Cell Division
- Transpiration and the Transpiration Lab
- Summative Activities for Unit 3
Essential Links
- The College Board’s AP Bio Course and Exam Description.
- Mr. W’s Ultimate AP Bio Review Outline: Takes the Course and Exam description and renders it into student (and teacher) friendly language.
- 2025-26 AP Bio Scope and Sequence Calendar: A spreadsheet that lays out the entire course.
Introduction: Sequencing Unit 3
Unit 3 of AP Bio focuses on Enzymes, Cellular Respiration, and Photosynthesis. This is one of my favorite units of the course. The biology is fabulous, with opportunities to talk about every key theme in biology. In addition, there are three major labs.
In terms of sequence, I suggest that you do the following (which is different from the College Board’s sequence (see their Course and Exam description, linked above)
- Start with Enzymes (Topics 3.1 – 3.2)
- Then do Cellular Respiration. This includes Topic 3.3 (general issues related to cell energy), followed by Topic 3.5 (Cellular Respiration)
- End with Photosynthesis (Topic 3.4)
Why cellular respiration before photosynthesis? For me, this is partly based on my professional history. I started teaching AP Biology using Neil Campbell’s Biology, which puts cellular respiration first. That sequence is also what’s used in my other favorite textbook: Principles of Life (Hillis, Sadava, Hill, and Price). It’s also used in Principles of Biology (Brooker, Widmaier, Graham, and Stirling). But it’s not a slam-dunk: Sylvia Mader teaches photosynthesis first, then moves on to cellular respiration.
In any case, cellular-respiration-first is the sequence I’ve adopted in my teaching and the interactive modules on Learn-Biology.com. What you’ll see is that teaching the electron transport chain, chemiosmosis, and ATP production in mitochondria sets the stage to easily transfer understanding of these processes to what happens in chloroplasts during the light reactions of photosynthesis.
Finally, we skipped some of the cell biology related to mitochondria and chloroplasts in Topic 2.1. You’ll see that embedded below in the objectives for cellular respiration and photosynthesis.
Enzymes
Objectives for Enzymes (Topics 3.1 – 3.2)
You can see the College Board’s original objectives for Topics 3.1-3.3 in their Course and Exam Description (link is above). Click here for these objectives in teacher-and-student-friendly format.
Enzyme tutorials on Learn-Biology.com
Learn-Biology organizes learning about enzymes into two tutorials, supported by this Student Learning Guide.
-
Topics 3.1 – 3.2, Part 1: Enzyme Structure and Function; Environmental Impacts on Enzymes
-
Topics 3.1-3.2, Part 2: Enzyme Inhibition and Regulation
Enzyme Labs and Other Activities
If you didn’t do the Starch Amylase Lab when you were teaching about monomers and polymers, then now you have another opportunity. If you did, then remind students that this was all about enzymatic hydrolysis.
Another spectacularly fun demonstration involves using catalase from liver tissue to decompose hydrogen peroxide. I like to do this as a demonstration before doing the potato catalase lab. Here’s a handout. You could easily convert this into a lab (but you’d need to be prepared to clean up a lot of test tubes).
The “official” lab for this unit is the Potato Catalase Lab. I’m indebted to Pam Phelps for sharing her version of this lab with me and teaching me (and a bunch of other teachers) how to do the lab via Zoom during the fall of 2020. I’ve revised Pam’s lab handout to include standard error calculations. Here’s my version.
If you want to add some music to your instruction, show my Enzymes! Music Video.
Cellular Respiration
Some Big Picture Ideas About Cellular Respiration
Cellular respiration is exciting to teach because it allows you to make use of pretty much everything you’ve taught in the course so far.
- It (mostly) happens in the mitochondria, an endosymbiotic organelle.
- The whole process is carried out by enzymes.
- The process of ATP production relies on
- Cellular compartmentalization (the intermembrane space);
- Protein structure (think of ATP synthase as a phenomenal example of a structure/function relationship at the molecular level);
- Active transport (protons getting pumped into the intermembrane space), and
- Facilitated diffusion (proton diffusion through ATP synthase back to the mitochondrial matrix).
- ATP and ATP synthesis via chemiosmosis is powerful evidence for the unity of life. It’s present in every domain of life (Archaea, Bacteria, and Eukarya). Not only that, but the ATP synthase channel that’s used in cellular respiration is evolutionarily homologous to the one used in photosynthesis.
I encourage you to challenge your students to do this kind of connecting. That can be as simple as listing the processes above (endosymbiosis, compartmentalization, protein structure, etc.), and asking students to brainstorm where they show up in the process.
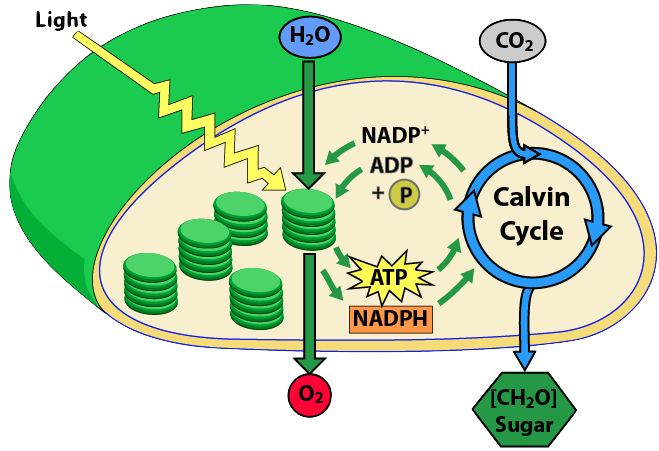
I use this diagram as my touchstone during this unit.

If you’ve been influenced by Understanding by Design,one of my favorite books about curriculum design, then you can think of the goal of the entire unit as this: students, when presented with this image, can explain the cellular and biochemical processes by which the chemical bond energy in glucose can be converted into ATP. During your unit, as you teach glycolysis, the link reaction, Krebs, and the ETC, you can come back to this diagram again and again.
It’s important that students understand that cellular respiration is built upon two types of sub-processes: REDOX, and phosphorylation. I go to some length to explain both in my Cellular Respiration Overview interactive tutorial, using diagrams like this for REDOX
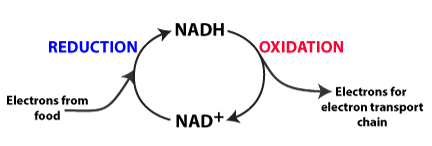
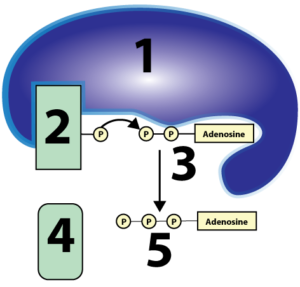
and this for substrate-level phosphorylation.
In terms of REDOX, you don’t need to go deeply into the chemistry. It’s enough for students to know that things that are reduced have more energy than things that are oxidized. Where’s the energy? In their electrons. It’s a bit confusing, but that electron energy is usually shown by the presence of one or more hydrogen atoms. That’s why NADH is the reduced form, and NAD+ is the oxidized form. To give this chemistry some real-world context, you can tell your students that a substance like peanut butter is reduced. So is bread. So are we. These are all examples of things with lots of chemical energy. By contrast, carbon dioxide is oxidized. So is ash. So is rust. These are all low-energy substances.
Once you’ve built that foundation, then it’s all downhill when you’re teaching about glycolysis (in which the oxidation of glucose is coupled to the reduction of NAD+ to NADH) or the Krebs cycle. In fact, that’s the way to control the detail so that your students don’t get overwhelmed. When you’re questioning your students to check for understanding, ask questions like What’s happening at 3 in the diagram below? You’re looking for an answer like this: The six-carbon compound is oxidized so that NAD+ can be reduced to NADH. What’s happening at 5? There, a different enzyme is using the chemical energy in the 4-carbon compound to phosphorylate ADP to ATP.
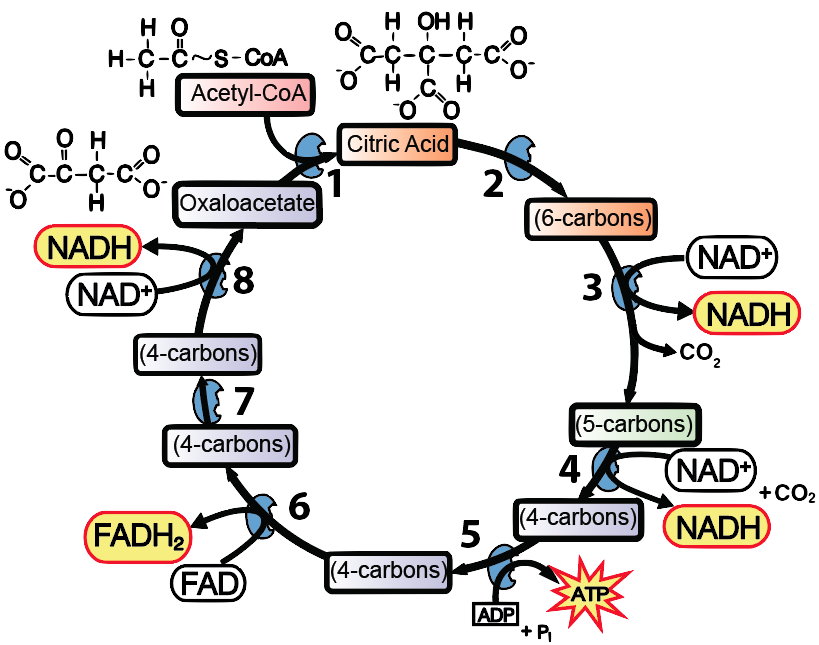
Note that you don’t need to teach any of the intermediates (though they are mentioned in my Krebs Cycle Song). All that our students need to know about is acetyl-CoA, Citric Acid, and oxaloacetate. And they should be able to figure out that the 5-carbon compound at 4 in the diagram above is more reduced than the 4-carbon compound at 7. How would your students know? Because the chemical energy in the 5-carbon compound that’s the reactant for step 4 was used to power the reduction of NAD+ to NADH, and then (after other transformations) of FAD to FADH2 at step 6. Reductions are always coupled to oxidations (and vice versa).
A final way to make this real is to follow the carbon dioxide molecules. I always teach my students that this is where the carbon dioxide they breathe out is coming from. Specifically, two out of every three carbon dioxide molecules that you exhale come from the Krebs cycle. The other 1/3 comes from the Link Reaction.
Learning Objectives for Energy and Cellular Respiration (Topics 3.4 and 3.6)
You can see the College Board’s original objectives for Topics 3.4 and 3.6 in their Course and Exam Description, or in Mr. W’s Ultimate AP Bio Review Outline (links are above)
Resources for teaching energy and cellular respiration on Learn-Biology.com
Our cellular respiration module consists of five tutorials, supported by this Student Learning Guide.
- Topic 3.3: ATP and Cell Energy
- Topic 3.5, Part 1: Cellular Respiration Overview
- Topic 3.5, Part 2: Glycolysis
- Topic 3.5, Part 3: The Link Reaction and the Krebs Cycle
- Topic 3.5, Part 4: The Electron Transport Chain and Chemiosmosis
- Topic 3.5, Part 5: Anaerobic Respiration and Fermentation
Additional cellular respiration resources and activities
Labs and demonstrations
The greatest thing about cellular respiration is that you can see it in action. You can measure CO2 production or oxygen consumption. I prefer to do the latter, the old-fashioned way, with respirometers.
- Here’s a link to a video that explains how these devices work: Measuring Respiration with a Respirometer (Video)
- Here’s my lab handout. My main piece of advice: long equilibration for the respiring beans in cold temperature.
You can also do some very simple demonstrations of fermentation. This includes demonstrations of alcohol fermentation by yeast and making yogurt (a lactic acid fermentation). Here’s a handout.
For the alcohol fermentation demonstration, get three flasks. Add water. Add a spoonful of yeast to flask 1. Seal with a balloon. Add a spoonful of sugar to flask 2. Seal with a balloon. As a spoonful of yeast and a spoonful of sugar to flask 3. Seal with a balloon. You’ll see results by the next day. It goes without saying that this could be the basis for a lot of inquiry.
Making yogurt is similarly simple. Start with Pasteurized Milk (and explain how Pasteurization works). I like to add some nonfat dry milk powder to make a thicker yogurt. Then mix in a bit of yogurt culture (a spoonful of yogurt from any brand). Incubate at about 37 C overnight, and you’ll have yogurt the next day. An Instant Pot has a yogurt setting…even easier.
I’ve embedded a video about anaerobic respiration in our tutorial about that topic.
Music
I’ve written three songs about cellular respiration. Glycolysis!, Krebs!, and the Electron Transport Chain. They all have Karaoke versions, so please encourage your students to sing! All of these songs are available on YouTube, but to make access really easy, they’re all on this page: Cellular Respiration: A Musical Review
Video Lectures
Two videos, “Intro to Cellular Respiration” and “Oxidative Phosphorylation” are embedded into the tutorials. If you want to show them to your students, you can also access them on this page: Cellular Respiration Overview Videos.
Additional Handouts
- Here’s the review sheet I give to my students to help them prepare for my cumulative assessment of cellular respiration.
- Before I flipped my classroom, I used to do comprehensive lecturing about most cellular respiration topics. During my lectures, I found that distributing this guided note-taking sheet was something that my students found very useful. With some minor modifications, you can make it into a visual review guide.
Flinn has great POGILs about ATP, Glycolysis/Krebs, and Oxidative Phosphorylation.
Extension
If you want to push your students a bit further, have them read and summarize this article from the NY Times about how sea otters use proton leakage to generate heat (but not ATP).
Photosynthesis
Note about timing: It shouldn’t take you a full two weeks to finish photosynthesis. You’ll be done about two days into next week, and then you can start Unit 4.
Most people don’t get what’s happening during photosynthesis
Most people deeply misunderstand photosynthesis. You can see this for yourself by asking your students (or your friends and family members) two questions:
- When a plant grows, where does most of the new mass come from?
- Where does the oxygen that photosynthesis produces come from?
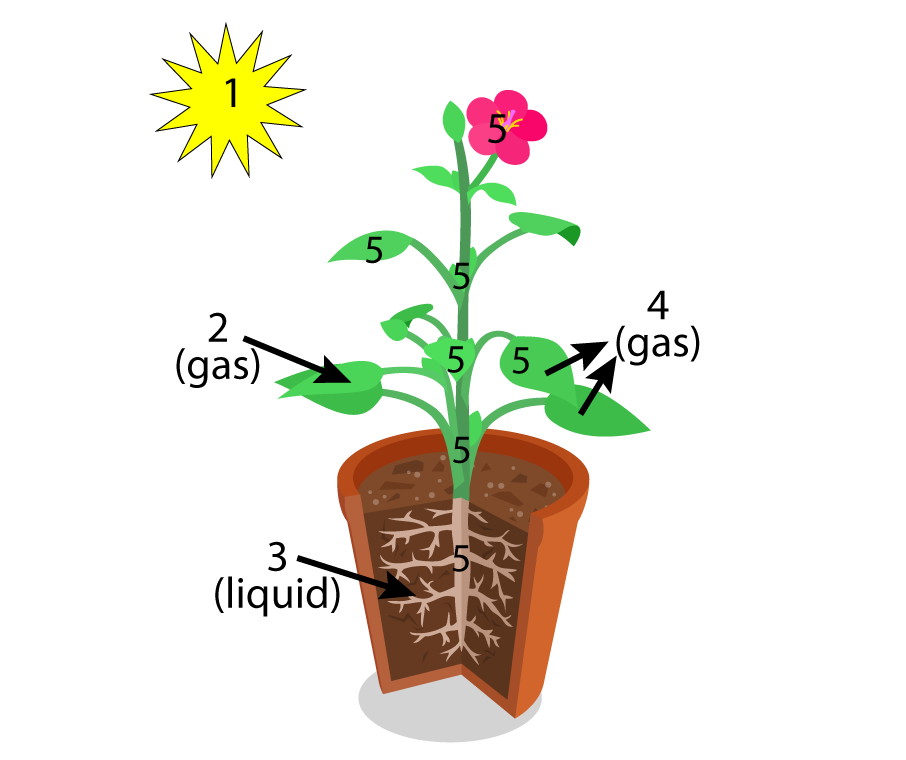
In terms of the first question, most of my students (and my friends who aren’t science-savvy) think that plants add new mass to their bodies from matter that’s absorbed from the soil. In other words, they think that “plant food” is like animal food: that when a plant grows, it’s absorbing matter from the soil and incorporating it into its growing body. They’re missing, in other words, the concept of carbon fixation, and the amazing idea that the added mass is mostly from CO2 in the air.
In terms of the second question, many folks who know that oxygen is produced by photosynthesis often mistakenly think that carbon dioxide is the source of that oxygen (not water). As pointed out by Nick Lane in Life Ascending, this mistake was even made by the Italian chemist and Nobel Laureate Primo Levi who wrote in his book The Periodic Table:
Our atom of carbon enters the leaf, colliding with other innumerable (but here useless) molecules of nitrogen and oxygen. It adheres to a large and complicated molecule that activates it, and simultaneously receives the decisive message from the sky, in the flashing form of a packet of solar light: in an instant, like an insect caught by a spider, it is separated from its oxygen, combined with hydrogen and (one thinks) phosphorus, and finally inserted in a chain, whether long or short does not matter, but it is the chain of life.
Sorry, Primo, but this is wrong. The oxygen produced by photosynthesis comes from water (or another electron donor), not carbon dioxide.
Here’s the general equation:

Note that the “H2A” varies among prokaryotic photosynthesizers. For example, in purple sulfur bacteria, the hydrogen donor can be hydrogen sulfide (H2S).
But in all eukaryotic photosynthesizers, and in cyanobacteria, the hydrogen donor is water. So the general equation is

For AP Biology, you can balance the equation and drop the H2O that appears as a product of the reaction, leaving us with

On several past AP exams, the College Board has tested this by showing the oxygen atoms in the products as labeled with isotopes of oxygen (O18). If you label the oxygen in carbon dioxide (CO182), then the heavy oxygen shows up in the carbohydrate. But if you label the oxygen in the water (H2O18), then the heavy oxygen shows up in the oxygen gas that’s released as a waste product (O218)
I try to avoid this misunderstanding by having students interact with diagrams like this one from my first photosynthesis tutorial (see below).
Similarly, this one, focusing on the inputs to the chloroplast from my second tutorial, serves the same purpose.
When you get to the Calvin cycle, you can emphasize some of its astonishing features. Some of these were highlighted in this story from NPR,
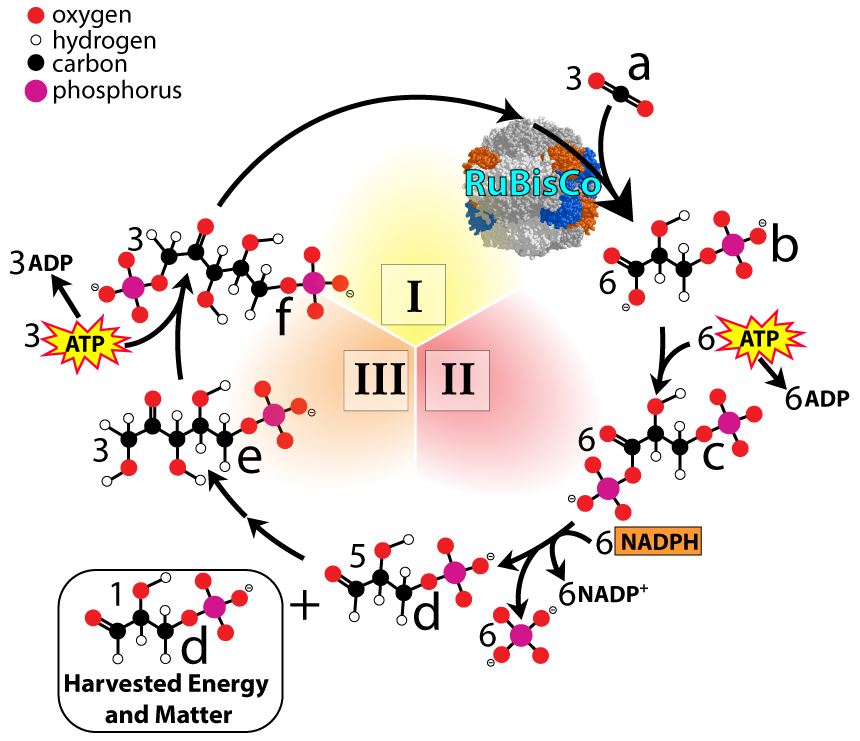
- Rubisco (ribulose bisphosphate carboxylase) is the enzyme that’s capable of snatching carbon dioxide out of the air and incorporating it into biological molecules. It might be the most abundant protein on earth. Makes sense: it’s in every chloroplast, in every leaf, in every tree, shrub, herb, blade of grass, and algae on Earth. It’s also in every cyanobacterium.
- If your students ever complain that this detailed (but wondrous) process is far removed from their daily concerns, remind them that every carbon atom in their body was once a molecule of carbon dioxide floating in the air. We all owe our very being to the Calvin Cycle.
- Rubisco and the Calvin Cycle as a whole evolved very early on in the history of life — way before there was an appreciable amount of molecular oxygen in the atmosphere or dissolved in the oceans. As a result, Rubisco has an enzymatic quirk: its active site can bind oxygen (and not just carbon dioxide). This is especially true at high temperatures, which cause Rubisco to incorporate oxygen into the Calvin Cycle, producing a toxic compound that plants have to detoxify, lowering the efficiency of plant growth. Plants like cacti and corn have, as a consequence, evolved supplementary pathways for fixing carbon dioxide. These are the C4 cycle and CAM photosynthesis, respectively. They’re no longer part of our curriculum, but they used to be (before AP Bio was redesigned in 2012). If you have some students that need some enrichment, these pathways are great topics for students to explore.
Photosynthesis Learning Objectives
You can see the College Board’s original objectives for Topic 3.5 in their Course and Exam Description, or in a friendlier form in Mr. W’s Ultimate AP Bio Outline.
Resources for teaching photosynthesis on Learn-Biology.com
Our five tutorials about photosynthesis are supported by this Student Learning Guide.
- Topic 3.5, Part 1: Introduction to Photosynthesis
- Topic 3.5, Part 2: Chloroplasts and the Two Phases of Photosynthesis
- Topic 3.5, Part 3: Light, Pigments, and Photosynthesis
- Topic 3.5, Part 4: The Light Reactions
- Topic 3.5, Part 5: The Calvin Cycle
Labs
The spinach leaf disc lab is a fabulous way to get your students to experiment with photosynthesis. The version in the previous link was adapted from one shared by Susan Wentzien at Lake Oswego High School. I’ve modified it to work as an inquiry lab (see the handout, starting on page 5).
While the spinach leaf disk is what most AP Biology teachers do these days, the College Board loves asking questions about a photosynthesis lab from the old lab manual that measures the photoreduction of the dye DPIP. DPIP is dark blue when it’s oxidized, and turns clear when it’s reduced. In this version of the lab, you’d extract chloroplasts from spinach leaves. The resulting chloroplast suspensions would be mixed with DPIP and then placed in the light under a variety of experimental conditions. For example, some chloroplasts would be boiled. Others would be covered in foil. A third group would be the positive control (exposed to light).
Here’s what the setup looks like.

DPIP’s role in the lab is to intercept electrons before they make it to NADP+ reductase. Instead of NADP+ getting reduced, DPIP gets reduced. As it gets reduced, DPIP becomes clear.
DPIP’s clarity under various conditions can be quantified with a spectrophotometer, or it can be recorded in a more qualitative way (darker to lighter, on a comparative scale). However you measure it, you can think of what’s happening as increased transmittance, or decreased absorbance. In this context, increased transmittance occurs as the DPIP gets reduced and becomes clearer. In a test tube, the clearer liquid (more reduced) allows for more transmittance of more light). Conversely, decreased absorbance is what happens as the dark, oxidized DPIP (which absorbs a lot of light, because it’s dark) becomes clearer and absorbs less and less as it transmits more and more.
If you can do this lab, then you’re an AP Bio superhero. But what’s more important is that your students have some idea about the setup and technique, because, as I said, the College Board, over the years, has asked many questions relating to the overall setup.
Here’s some sample data that comes from a lab handout from the probe company Vernier.

Note that in the unboiled sample, the absorbance plummets over time. Why? Because the intact chloroplasts are shooting electrons at DPIP. As the DPIP gets reduced, it goes from dark to clear, and its absorbance falls. If you can get your students to explain this, then it’s mission accomplished/!
I also have a couple of old AP test questions about this lab that you can share with your students on this review sheet.
Music videos about photosynthesis
I’ve written three songs about the light reactions of photosynthesis. You can view them on this page: The Light Reactions: A Musical Review.
Photosynthesis Video Lecture
To give your students an overview of the light reactions, have them watch this video lecture (which is embedded, in various sections, into the tutorials in this module. From start to finish it’s about 12 minutes long.
Additional Handouts
- Here’s the review sheet I give to my students to help them prepare for my cumulative assessment on photosynthesis.
- Before I flipped my classroom, I used to do comprehensive lecturing about photosynthesis. I’ve modified my note-taking sheet into this diagram sheet that I spend a period or two going over with my students. It includes (on the last page) a very useful (and simple) demonstration that you can do using elodea in bromothymol blue solution.
Flinn has an excellent POGIL about photosynthesis that covers both the light reactions and the Calvin cycle.
Summative Activities for Unit 3
To help your students pull together what they’ve learned from Unit 3,
- Send them to this cumulative review page, where they’ll find, objectives, flashcards, and click-on challenges.
- Complete the Unit 3 progress check items on AP Classroom.
Transpiration, the Transpiration Lab, and Water Potential
The term “transpiration” only occurs once in the College Board’s Course and Exam description. It’s a link to the Transpiration Lab, which is Investigation 11 in the College Board’s AP Bio Lab Manual. To see the College Board’s version of the lab, click the preceding link and then search for “Transpiration.”
In terms of learning objectives, here’s what the College Board lists in their lab manual:
- IST-5.A: Explain how the behavioral responses of organisms affect their overall fitness and may contribute to the success of the population.
- ENE-3.D: Explain how the behavioral and/or physiological response of an organism is related to changes in the internal or external environment.
- SYI-1.H: Explain how the density of a population affects and is determined by resource availability in the environment.
For me, transpiration is important to teach because it allows me to teach the concept of water potential. I don’t teach water potential when I teach about osmosis in unit 2. At that point, it seems like overload, especially when the idea that water always flows from hypotonic to hypertonic explains everything that students need to know for the diffusion and osmosis labs. But explaining transpiration requires water potential. I do that through my transpiration tutorial. The tutorial will also provide your students with enough background about the structures associated with plant transport so that they’ll have a good understanding of what’s happening during the lab.
Like many teachers, I do a different version of the lab: whole plant transpiration.
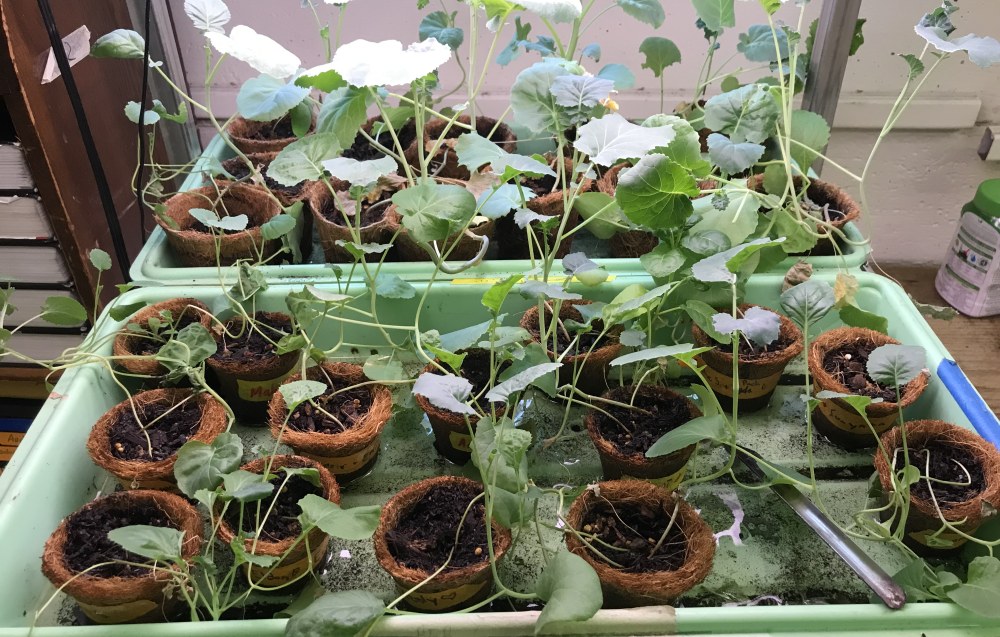 In the first week of school, I have my students plant broccoli seeds in small containers. For me, that’s in the third week of August. Two and a half months later, with light shining 24 hours/day in a light tray, the broccoli looks like what you see on your left.
If you didn’t plant broccoli, just head on over to your local nursery and get any plant that grows in those little six-pack containers. As long as it has one stem and nice big leaves, you’ll be fine.
In the lab, you have your students place the plant (with its container) in a plastic bag so that the stems and leaves are outside the bag. If you use a zip lock bag and scotch tape, you can get a pretty good seal, as shown below.
![]()
Now, the only way that water can leave is through the stems and leaves.
Mass the plants, then set the plants in a few different environments: typically one with light, one with light + wind, and one in darkness. After a day or two, mass again.
You could stop there, but it leaves out a big variable: the surface area of the leaves. To control for that, you have to do a bit of measurement and math. You have students trace the plant’s leaves on graph paper, measure the surface area, and then calculate the amount of water lost/cm2.
Typically, another part of the lab involves viewing leaf stomata. For context, I also have my students view and sketch a cross-section of a typical dicot leaf (from a prepared slide).
Here’s a handout for both parts of the lab. If you have ideas for improvement, let me know.